 哈勃私语
哈勃私语Requirements
- A Server running CentOS 7.x.
- Minimum 512MB RAM, but recommended is 1GB or more.
- Root access to your account. If you are logged in as non-root user, please use sudo su command to login as root user.
Installing and Configuring LAMP for Magento
First of all it is very important to update the packages and repositories available in your system using the following command.
yum -y update
Once the packages are updated, run the following commands to install the required packages.
    yum -y install httpd
    rpm -Uvh http://dev.mysql.com/get/mysql57-community-release-el7-8.noarch.rpm
    yum -y install mysql-community-server
The above commands will install the Apache web server and MySQL server on your server. Now start Apache web server and MySQL server also enable them to automatically start at system startup using the following command.
    systemctl start httpd
    systemctl start mysqld
    systemctl enable httpd
    systemctl enable mysqld
Now configure Apache for mod_rewrite by editing the configuration file using your favorite editor. It is important to enable the mod_rewrite module as Magento extensively uses rewrites to generate links to its static resources. The configuration file for httpd can be found at /etc/httpd/conf/httpd.conf. In this tutorial we will be using the nano editor, but you can use any editor of your choice. To install nano on your server run yum -y install nano.
nano /etc/httpd/conf/httpd.conf
Now scroll down and look for the following lines.
    # LoadModule foo_module modules/mod_foo.so
    #
    Include conf.modules.d/*.conf
Add the following line just below these lines:
LoadModule rewrite_module modules/mod_rewrite.so
Now scroll down further to find the following lines:
     #
        # Possible values for the Options directive are "None", "All",
        # or any combination of:
        #   Indexes Includes FollowSymLinks SymLinksifOwnerMatch ExecCGI MultiViews
        #
        # Note that "MultiViews" must be named *explicitly* --- "Options All"
        # doesn't give it to you.
        #
        # The Options directive is both complicated and important.  Please see
        # http://httpd.apache.org/docs/2.4/mod/core.html#options
        # for more information.
        #
        Options Indexes FollowSymLinks#
        # AllowOverride controls what directives may be placed in .htaccess files.
        # It can be "All", "None", or any combination of the keywords:
        #
        AllowOverride None
Change the value of AllowOverride None to AllowOverride All.
Now save the file and quit the editor.
Now you will need to secure your MySQL installation but before that you will need your password for MySQL root user, which was automatically set during installation. Run the following command to obtain your root password.
grep 'temporary password' /var/log/mysqld.log
You will see following output.
     [root@ip-172-31-32-19 ~]# grep 'temporary password' /var/log/mysqld.log
     2016-07-27T18:28:00.276357Z 1 [Note] A temporary password is generated for root@localhost: ;jldNGPIE3k0
In above example output, you can clearly see a password which is generated for your root account. Now run the following command to run the script to secure your MySQL server installation.
mysql_secure_installation
It will ask you for current password for root user, use the same password which we have obtained using the command above. Now set a strong root password for your MySQL root user, by default MySQL comes with validate_password plugin, hence you will be required to use a password that contains at least one uppercase letter, one lowercase letter, one digit, and one special character and that the total password length is at least 8 characters. Then it will ask you some configuration questions, the recommended answer is yes for all the questions.
    Securing the MySQL server deployment.Enter password for user root:
    The 'validate_password' plugin is installed on the server.
    The subsequent steps will run with the existing configuration
    of the plugin.
    Using existing password for root.Estimated strength of the password: 100
    Change the password for root ? ((Press y|Y for Yes, any other key for No) : yNew password:Re-enter new password:Estimated strength of the password: 100
    Do you wish to continue with the password provided?(Press y|Y for Yes, any other key for No) : y
    By default, a MySQL installation has an anonymous user,
    allowing anyone to log into MySQL without having to have
    a user account created for them. This is intended only for
    testing, and to make the installation go a bit smoother.
    You should remove them before moving into a production
    environment.Remove anonymous users? (Press y|Y for Yes, any other key for No) : y
    Success.Normally, root should only be allowed to connect from
    'localhost'. This ensures that someone cannot guess at
    the root password from the network.Disallow root login remotely? (Press y|Y for Yes, any other key for No) : y
    Success.By default, MySQL comes with a database named 'test' that
    anyone can access. This is also intended only for testing,
    and should be removed before moving into a production
    environment.Remove test database and access to it? (Press y|Y for Yes, any other key for No) : y
     - Dropping test database...
    Success.- Removing privileges on test database...
    Success.Reloading the privilege tables will ensure that all changes
    made so far will take effect immediately.Reload privilege tables now? (Press y|Y for Yes, any other key for No) : y
    Success.All done!
Magento requires PHP in order the work. PHP versions supported by Magento is from PHP 5.6 to PHP 7.1. In this tutorial we will be installing PHP 7 and some additional required PHP extensions for Magento installation. Run the following commands to install PHP 7 in your server.
    yum install -y http://dl.iuscommunity.org/pub/ius/stable/CentOS/7/x86_64/ius-release-1.0-14.ius.centos7.noarch.rpm
    yum -y update
    yum -y install php70u php70u-pdo php70u-mysqlnd php70u-opcache php70u-xml php70u-mcrypt php70u-gd php70u-devel  php70u-intl php70u-mbstring php70u-bcmath php70u-json php70u-iconv
You can verify the version of your PHP installation using the following command.
php -v
You should see following output.
    PHP 7.0.9 (cli) (built: Jul 21 2016 11:48:03) ( NTS )
    Copyright (c) 1997-2016 The PHP Group
    Zend Engine v3.0.0, Copyright (c) 1998-2016 Zend Technologies
        with Zend OPcache v7.0.9, Copyright (c) 1999-2016, by Zend Technologies
Now edit your php configuration file using the following command.
nano /etc/php.ini
Scroll down and look for the following lines.
    ; Maximum amount of memory a script may consume (128MB)
    ; http://php.net/memory-limit
    memory_limit = 128M
Increase the memory limit according to your server’s RAM amount, for example if you have 2 GB RAM in your server, you may want to give it 1GB. If you’re giving the memory limit in MegaBytes, then use M at the end of the value, you can also specify this value in GigaBytes using G letter at the end of the value.
Scroll down further to find the following lines.
    [Date]
    ; Defines the default timezone used by the date functions
    ; http://php.net/date.timezone
    ;date.timezone =
You need to specify a timezone for your PHP settings, otherwise you may get a warning later. Magento uses the timezone specified by PHP. Uncomment the last line and specify a time zone as per your preference. It should look like shown below, just replace Asia/Kolkata according to your choice.
    [Date]
    ; Defines the default timezone used by the date functions
    ; http://php.net/date.timezone
    date.timezone = Asia/Kolkata
Finally restart your web server using the following command.
systemctl restart httpd
As we have installed and configured Apache, MySQL and PHP 7, we can now move on to the next step of the installation where we will be creating a database and a database user for Magento Data.
Creating Database
To create a database login to your MySQL command line using the following command.
mysql -u root -p
Now enter your MySQL root password which you have created earlier. You should see following output.
    [root@ip-172-31-32-19 ~]# mysql -u root -p
    Enter password:
    Welcome to the MySQL monitor.  Commands end with ; or g.
    Your MySQL connection id is 2
    Server version: 5.7.13 MySQL Community Server (GPL)Copyright (c) 2000, 2016, Oracle and/or its affiliates. All rights reserved.Oracle is a registered trademark of Oracle Corporation and/or its
    affiliates. Other names may be trademarks of their respective
    owners.Type 'help;' or 'h' for help. Type 'c' to clear the current input statement.
mysql>
Now run the following query to create a new database.
CREATE DATABASE magento;
The above command will create a database named magento, Now you need to create the database user for this database and assign the user full access over the database. Use the following command for same.
    GRANT ALL ON magento.* TO magentouser@localhost IDENTIFIED BY 'StrongPassword';
    FLUSH PRIVILEGES;
You can rename the database name from magento to any name according to your choice, also you can change Magento DB username from magentouser to anything you want. Make sure you use a strong password at the place of StrongPassword, otherwise you will get an error saying that the password does not meet require password strength. Now exit from MySQL prompt using the following command.
exit
You can also verify if the database and user has been created sucessfully using the following command.
mysql -u magentouser -p
It will prompt you for password, once you are logged in you can see the list of database using the following command.
SHOW DATABASES;
You should see the following output.
    [root@ip-172-31-32-19 ~]# mysql -u magentouser -p
    Enter password:
    Welcome to the MySQL monitor.  Commands end with ; or g.
    Your MySQL connection id is 5
    Server version: 5.7.13 MySQL Community Server (GPL)Copyright (c) 2000, 2016, Oracle and/or its affiliates. All rights reserved.Oracle is a registered trademark of Oracle Corporation and/or its
    affiliates. Other names may be trademarks of their respective
    owners.Type 'help;' or 'h' for help. Type 'c' to clear the current input statement.
mysql> SHOW DATABASES;
+——————–+
| Database |
+——————–+
| information_schema |
| magento |
+——————–+
2 rows in set (0.00 sec)
Exit from the MySQL command line using exit command. As we have our database configured, we proceed to install Composer.
Installing Composer
Composer is a package manager for the PHP programming language that provides a standard format for managing dependencies of PHP software and required libraries. To install composer run the following command.
curl -sS https://getcomposer.org/installer | php
The above command will install the latest version of composer in your server, you will see following output.
    All settings correct for using Composer
    Downloading 1.2.0...
Composer successfully installed to: /root/composer.phar
Use it: php composer.phar
In order to use composer globally run the following command.
mv composer.phar /usr/bin/composer
You can verify if composer is successfully installed using the following command.
composer -V
You will see following output.
    [root@ip-172-31-32-19 ~]# composer -V
    Composer version 1.2.0 2016-07-19 01:28:52
Now as we have composer installed, we can proceed to the installation of Magento.
Installing Magento
You can install magento using many different methods, also you can choose to install Magento with or without sample data. If you are installing Magento for evaluation purpose, you can choose to install sample data, if you are installing Magento for production environment, you can choose to install a fresh Magento and configure it yourself from scratch.
The best way to install Magento is to download the Magento clone using Git and then install it using composer. This method is the only method of installation in which you may need not to create an account in Magento website. Download git using the following command.
yum -y install git
Now download Magento clone using git with the following command.
    cd /var/www/html/
    git clone https://github.com/magento/magento2.git
The above command will create a directory named magento2 and store the installation files in it.
The above command will install the latest version of Magento software into your server, which is a development version by default. It is important to switch to a stable release, if you don’t then you won’t be able to upgrade the installation in future. If you wish to switch to a stable release, then run the following command.
cd magento2 && git checkout tags/2.1.0 -b 2.1.0
The above command will change the directory to your magento install directory and will checkout to a stable version 2.1.0. You can choose to checkout another version of Magento.
You will probably want to move all the installation files to document root of the web server, because if you do not, then your magento will install on http://your-server-IP/magento2.
shopt -s dotglob nullglob && mv /var/www/html/magento2/* /var/www/html/ && cd ..
Now your magento will be installed on your document root directory and will be accessible directly on http://Your-Server-IP, not in subfolder magento2.
Now you will need to set appropriate permissions to the files and folders of Magento, run the following commands for same.
    cd /var/www/html
    chown -R :apache /var/www/html
    find /var/www/html -type f -print0 | xargs -r0 chmod 640
    find /var/www/html -type d -print0 | xargs -r0 chmod 750
    chmod -R g+w /var/www/html/{pub,var}
    chmod -R g+w /var/www/html/{app/etc,vendor}
    chmod 750 /var/www/html/bin/magento
Now install Magento using the following command.
composer install
The above command will install the Magento software in your server by installing required frameworks.
Finishing Installation
Now you have both the options to install Magento using web based interface by browsing to the following address using your favorite browser.
http://your-server-IP
Now follow the instruction provided on the web interface to finish the installation. Or you can also install the software using the command line. Use the following command to finish the installation of Magento.
Make sure that you change these values according to your installation environment. You can also use a domain name at in the place of –base-url, if you have configured the DNS. It is advised that you use some random word to in –backend-frontname, to tighten the security of your Magento admin panel.
Please note that whenever you have a space or a special character in the value of any option, enclose it with a single or double quote.
    /var/www/html/bin/magento setup:install
    --admin-firstname=Liptan
    --admin-lastname=Biswas
    --admin-email=me@liptanbiswas.com
    --admin-user=admin
    --admin-password='StrongPassword'
    --base-url='http://172.16.0.1/'
    --backend-frontname=admin
    --db-host=localhost
    --db-name=magento
    --db-user=magentouser
    --db-password='mysqlDBpass'
    --currency=GBP
    --use-rewrites=1
    --cleanup-database
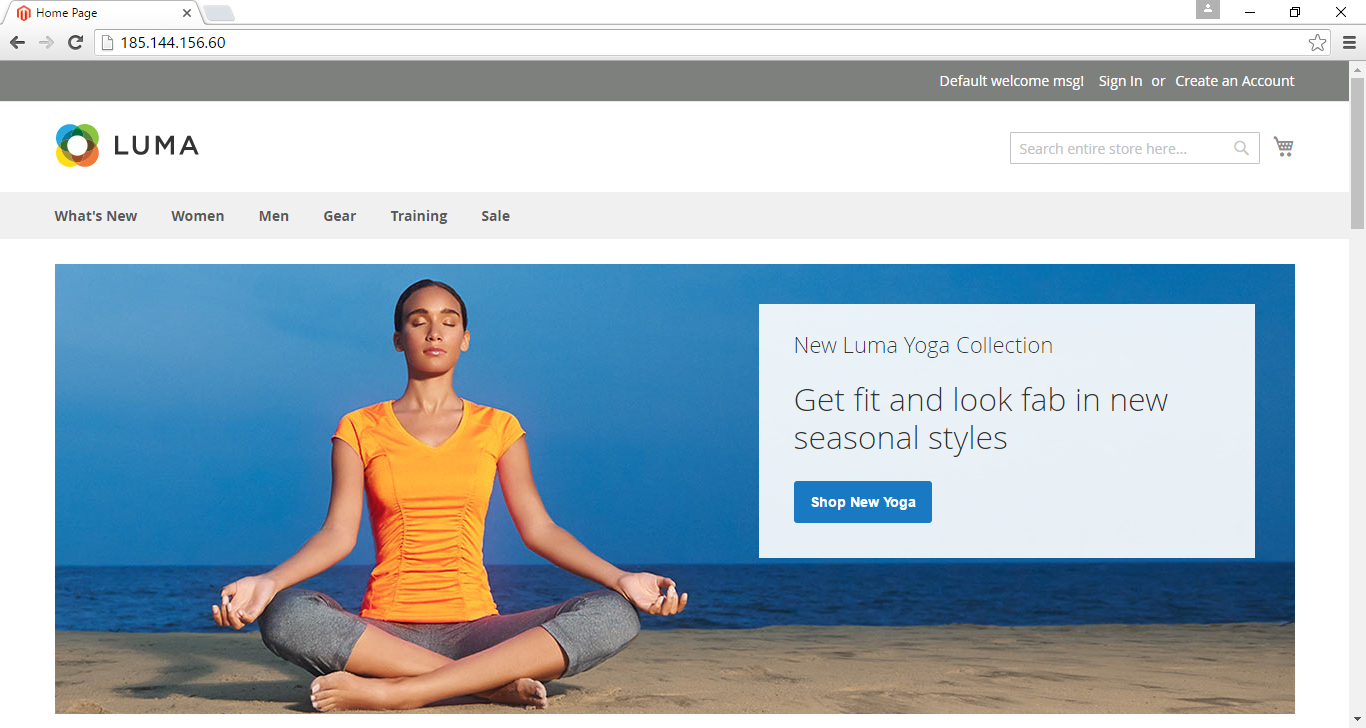
The above command will take some time to finish the installation as the installer will now write the data to database. Once the installation finishes, you can access your website on
http://Your-server-IP
You will see following interface.

If your Magento website is not shown, instead you get error 500 or Internal Server Error, you will need to reset the file permissions, using the following command.
chown -R :apache /var/www/html && find /var/www/html -type f -print0 | xargs -r0 chmod 640 && find /var/www/html -type d -print0 | xargs -r0 chmod 750 && chmod -R g+w /var/www/html/{pub,var} && chmod -R g+w /var/www/html/{app/etc,vendor}
Check your website again, you must see your Magento website. You can login to your Magento administration dashboard by browsing the following link.
http://Your-Server-IP/admin
If you have used a custom value in –backend-frontname then use that value instead of /admin.
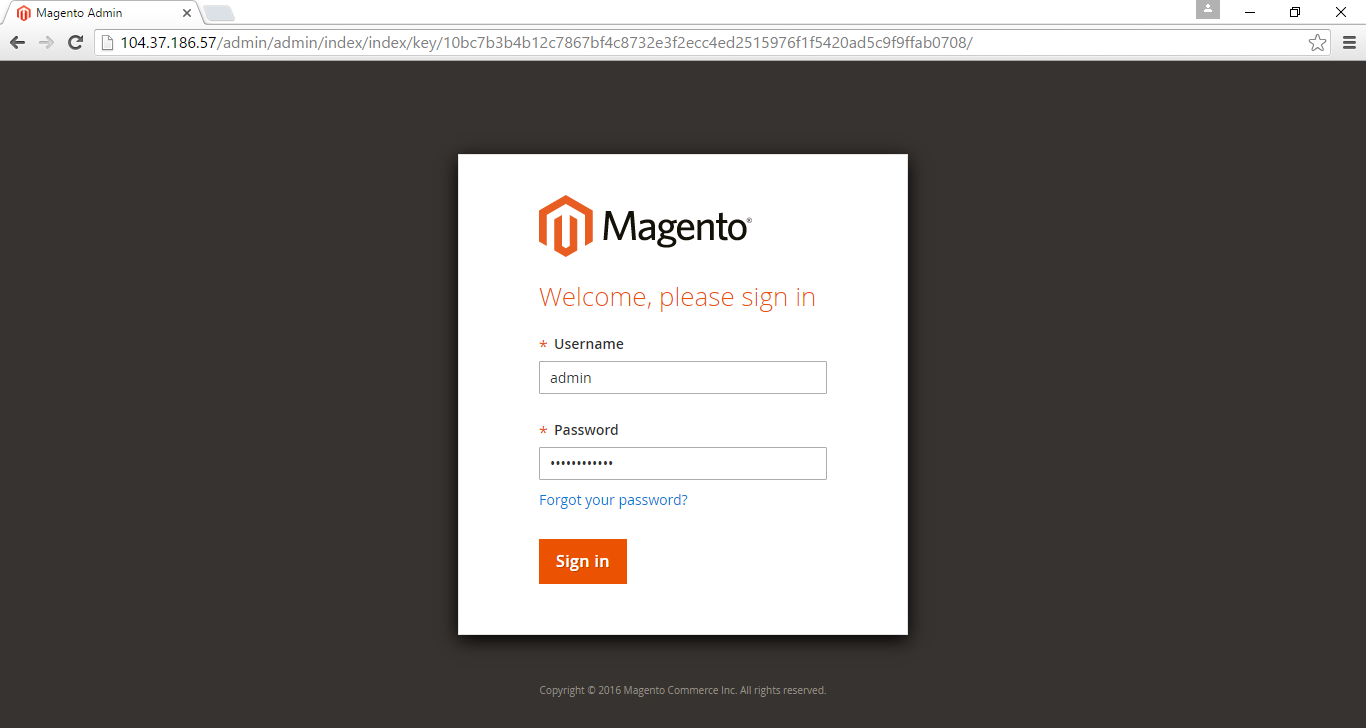
Now login to your admin panel using the username and password you used during installation. Once you are logged in, you will see following interface.

Setting up Cron
Finally you will need to setup cron to run the scheduled jobs. To configure the cron jobs, run the following command.
crontab -u apache -e
The above command will open the cron configuration file for the user apache using vi editor. If you get an error saying -bash: crontab: command not found. Run the following command to install crontab.
yum -y install cronie
Now add these lines at the end of the file, by pressing i in vi editor, once done press esc button and the :wq to write the file and quit the editor.
    */10 * * * * php -c /etc /var/www/html/bin/magento cron:run
    */10 * * * * php -c /etc /var/www/html/update/cron.php
    */10 * * * * php -c /etc /var/www/html/bin/magento setup:cron:run
Installing Sample Data
The above installation will produce an ideal platform for your production site. But if you wish to evaluate Magento before making your production website. You can do so by installing sample data in your recently installed Magento site.
Run the following command to clone the sample data in your server.
    cd /var/www/html
    git clone https://github.com/magento/magento2-sample-data.git
Now run the following command to create symlinks to the Magento installation.
php -f magento2-sample-data/dev/tools/build-sample-data.php -- --ce-source="/var/www/html"
You will see following output.
    All symlinks you can see at files:
    /var/www/html/magento2-sample-data/dev/tools/exclude.log
Now you will need to clear the cache and file generated using the following command.
rm -rf var/cache/* var/page_cache/* var/generation/*
Now you can upgrade the installation and install sample data using following command.
    php bin/magento setup:upgrade
    php bin/magento setup:di:compile
Once the installation is finished, you can check back your website in your favorite browser and you will see your storefront is loaded sample data.
Upgrade Installation
In future if you want to upgrade your Magento version to the latest version, you can do so using the following command.
    cd /var/www/html
    composer update
or
git pull origin
Conclusion
In this tutorial we have installed Magento 2 Community Edition on CentOS 7.x. You can now easily deploy Magento 2 either for production use or for development use. Apart from the method of installation described above, you can also install the software by downloading the installer archive from the Magento Website. You can upload and extract the installer to your server and then use web interface to install your software.
未经允许不得转载:哈勃私语 » 在centos7上安装magento2教程
本文共15802个字 创建时间:2017年8月24日14:59