 哈勃私语
哈勃私语Step 1: Install SMTP
Run the following command in Magento 2 root folder
composer require mageplaza/module-smtp
php bin/magento setup:upgrade
这个时候如果服务器没有安装composer的话,会提示没有composer这个命令,那么就先安装一下composer,运行命令:
yum install composer
安装composer完成后,再次运行一下
composer require mageplaza/module-smtp
php bin/magento setup:upgrade
该命令的作用是激活Magento2相关的Magento插件。在运行完该命令后,会有个提示:
Please re-run Magento compile command
该命令的作用是重新运行Magento编译,可通过如下命令来重新编译:
php bin/magento setup:di:compile
It will automatically install SMTP module,这样SMTP模块就算安装完成了,我们也可以进入到magento后台的商店—配置里面进行查看,如果有SMTP这个选项就说明安装成功了。
Step 2: Configuration(配置收发邮件)
Still from the same structure with General Configuration, scroll down to see SMTP Configuration Options.
进入到magento2的后台,路径:商店—配置—里面的第一个(SMTP),进行相应的设置就行,选择gmail,然后load一下。
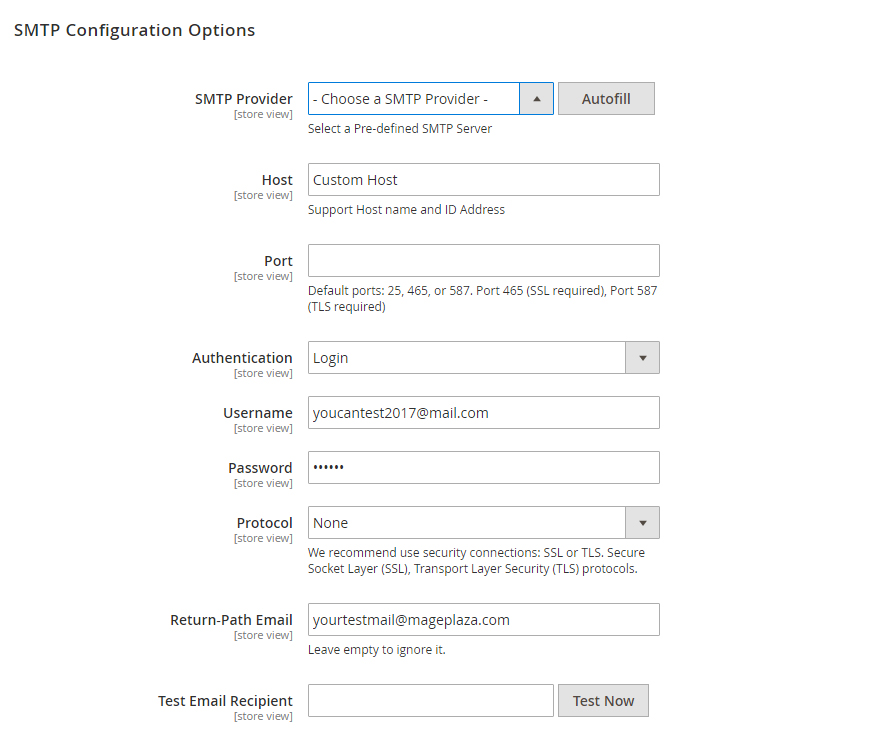
- In SMTP Provider field, at the moment we support provider nearly 30 SMTP email service providers so feel free to choose your appropriate provider. Click Auto Fill button to fill Host, Port, Authentication and Protocol automatically, which are compatible with the SMTP provider you had chosen.
- At Host field, type your Support Host name and ID Address. You can also custom STMP Provider’s Host name at here. If you had clicked Auto fill button at the above field, you can give this step a free pass.
- Port is a specific gate where emails will be sent through. You can also pass this step if you had choose Auto fill from the first place. In general, there will be 3 kinds of Default Port
- Port 25: Emails sent by other Protocol which different SSL will be sent through this portal
- Port 465: Emails sent by other Protocol SSL will be sent through this portal
- Port 578: Emails sent by other Protocol TLS will be sent through this portal
- Authentication field is place where you decide an authentication method. If you hadn’t clicked Auto fill button before, please note those basic methods
- Login: Authentication by login to the account through Username and Password that will be filled in the next field. Most of provider will require this method.
- Plain
- CRAM-MD5
- Account: where you enter the account name matching format of the SMTP Provider you had selected
- Password: password of the Username. After saving, the password will be encrypted into ******
- Protocol: pass this step if you had chosen Auto fill, or you can select one of the providing protocol below here
- None: when you select this protocol, you have to accept all the risk may occur in the process of sending.
- SSL stands for Secure Socket Layer. This protocol ensures that all data exchanged between the web server and the browser is secure and stay safe.
- TLS means Transport Layer Security. This protocol secures data or messages and validates the integrity of messages through message authentication codes.
- Return-path email: leave it empty if you want to ignore this.
- Test email recipient: This is the field for you to test the operation of the extension. After filling all fields, click Test Now button. If the information entered is valid, a successful email notification will be sent from Username to Email Test. That email will have the following content:

未经允许不得转载:哈勃私语 » centos7下为magento2安装SMTP邮件服务
本文共2643个字 创建时间:2017年9月22日10:02