samba是Linux系统上的一种文件共享协议,可以实现Windows系统访问Linux系统上的共享资源,现在介绍一下如何在Ubuntu 16.04上安装和配置samba,以及ubuntu上挂载windows共享盘的方法。此方法仅适用于ubuntu,windows两台不同的电脑,在局域网下。如果是windows与windows下虚拟机中的ubuntu(同一台电脑),在虚拟机中设置即可。
1. 在ubuntu下打开终端,并输入:
sudo apt-get update
2. 安装samba服务,在终端中输入:
sudo apt-get install samba samba-common
进行安装
3. 建立你想共享出去的文件夹,在终端中执行:mkdir /home/folder_name (folder_name是你想共享出去的文件夹名称)
4. samba安装好之后,会在/etc/samba/文件夹下有一个smb.conf文件,此文件是samba的一个配置文件。
5. 编辑此文件,用gedit或者vi都可以,在终端中执行:
sudo gedit /etc/samba/smb.conf 或者执行:sudo vi /etc/samba/smb.conf
6. 在其中添加一行:security = user ,添加这一行的目的在于,只有输入账号和密码才能访问此文件夹。添加的位置如下:
#### Debugging/Accounting ####

# This tells Samba to use a separate log file for each machine

# that connects

   log file = /var/log/samba/log.%m

# Cap the size of the individual log files (in KiB).

   max log size = 1000

   security = user

# If you want Samba to only log through syslog then set the following

# parameter to 'yes'.

#   syslog only = no

# We want Samba to log a minimum amount of information to syslog. Everything

# should go to /var/log/samba/log.{smbd,nmbd} instead. If you want to log

# through syslog you should set the following parameter to something higher.

   syslog = 0

# Do something sensible when Samba crashes: mail the admin a backtrace

   panic action = /usr/share/samba/panic-action %d

####### Authentication #######
7. 建立关联你共享的文件夹,在此文件的结尾添加:
[share]                          //是你在windows上连接的时候需要的
   comment = my share directory  //描述语句
   path = /home/princess/share   //是你共享的文件夹的路径
   browseable = yes
   writable = yes
添加的位置如下,,我这边共享了三个,你也可以同时共享多个:
# Windows clients look for this share name as a source of downloadable

# printer drivers

; [print$]

   ; comment = Printer Drivers

   ; path = /var/lib/samba/printers

   ; browseable = yes

   ; read only = yes

   ; guest ok = no

# Uncomment to allow remote administration of Windows print drivers.

# You may need to replace 'lpadmin' with the name of the group your

# admin users are members of.

# Please note that you also need to set appropriate Unix permissions

# to the drivers directory for these users to have write rights in it

;   write list = root, @lpadmin

[share]

   comment = my share directory

   path = /home/princess/share

   browseable = yes

   writable = yes

[projects]

   comment = my share directory

   path = /home/princess/projects

   browseable = yes

   writable = yes

[download]

   comment = my share directory

   path = /home/princess/download

   browseable = yes

   writable = yes
8. samba配置完成之后,就要为samba建了用户了,在终端中执行:
sudo useradd smbuser
(在此,smbuser尽量建立为你现在的用户名,不然的话对你现在用户的所有的文件只有读的权限。)
9. 为你建立的smb用户设立密码,在终端中执行:sudo smbpasswd -a smbuser,之后输入密码确认。 然后重启smb服务,在终端中执行指令:
$ sudo service smbd restart
10. 在终端中输入ifconfig查看ubuntu的IP, 我在此以192.168.1.1为例。
11. 之后在windows中win+R键调出运行,在其中输入\\192.168.1.1,回车之后你会看到你分享出来的文件夹,双击输入账户和密码就可以了。
有的说好samba不是很稳定,所以我们在window上打开的时候可能会连不上,等一会儿再次连一下就行了。
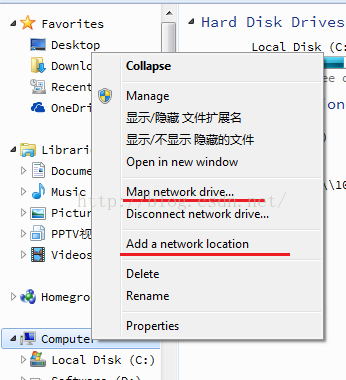
12. 如果你想长久保存,像点击C盘或者D盘那样的话,就右击我的电脑添加一个网络位置或者映射一个网络驱动器。如下图

之后输入\\192.168.1.1\folder_name,点击确认,最后输入用户名和密码即可。
以上是windows访问ubuntu共享的文件夹。接下来为你们介绍在ubuntu上访问windows共享的文件夹:
1. 首先先确保windows电脑的IP 和ubuntu电脑的IP在同一个字段。例如
windows IP:192.168.1.8
ubuntu IP: 192.168.1.1
如果windows的IP是192.168.5.8的话,windows上可以访问ubuntu共享的文件夹,而ubuntu不能访问windows共享的文件夹。换句话说,只能单向ping通。
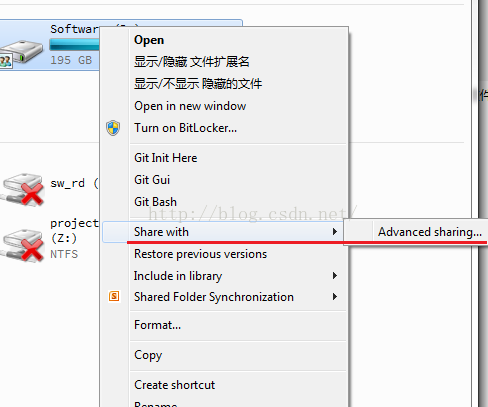
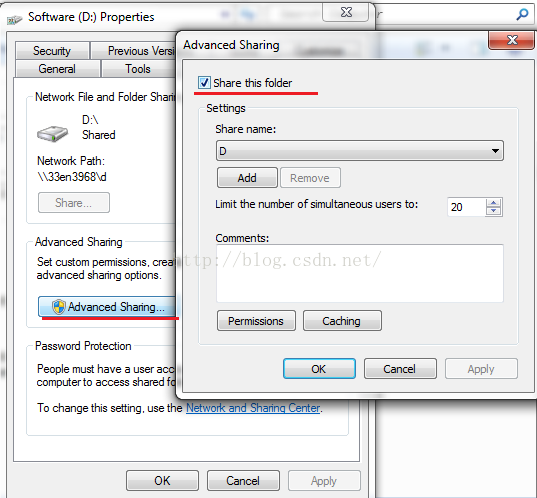
2. 右击你想共享出去的文件夹或者盘(比如D盘),如下图,勾选“分享此文件夹”,之后确认即可:


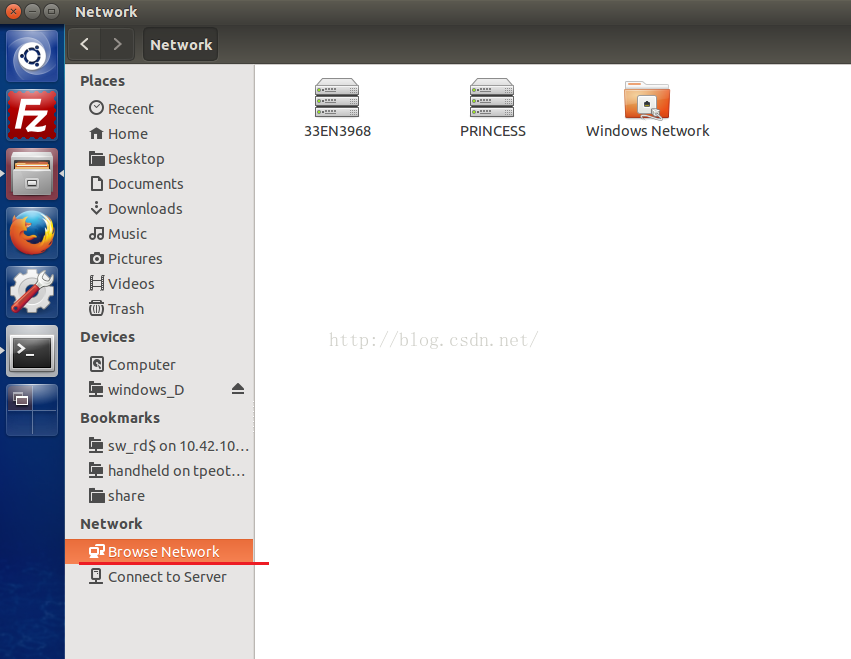
3. 完成上面的步骤之后,就可以在ubuntu电脑中看到了。随便打开一个文件夹,在左下角点击进去就可以看到windows分享出来的文件夹了,
不过此时显示的不是你分享出来的文件夹,而是你的电脑名,如果你不知道,你可以在“我的电脑–>属性”中看到,或者在cmd终端中执行指令ipconfig /all可以看到,如下图;


4.如果你想方便一点的话,可以挂载到某一个文件夹下面,在ubuntu终端中执行如下命令;
$ sudo mount -t cifs -o uid=${UID},gid=${UID},username=xiao,password=xiao123,iocharset=utf8 //192.168.1.2/d/ /home/princess/windows_D
uid和gid 是为了支持读写执行的权限,username和password是你windows上的用户名和密码,iocharset是为了更好的支持中文,192.168.1.2是你windows的IP地址,d是你分享出来的文件夹名称,后面的是你需要挂载到ubuntu的某个路径,最后输入密码确认即可。你也可以通过如下命令免输密码,echo -e “passwd\n”,比如我ubuntu的密码是 ?(两个空格一个问号),我就可以这样写,按回车即可:
echo -e " ?\n" | sudo -S mount -t cifs -o uid=${UID},gid=${UID},username=xiao,password=xiao123,iocharset=utf8 //10.42.97.94/d/ /home/princess/windows_D
5. 最后你就可以在你挂载的路径下看到你分享出来的文件夹里的内容了。
未经允许不得转载:哈勃私语 » ubuntu16.04桌面版与win7相互共享文件
本文共4002个字 创建时间:2018年4月16日22:52 哈勃私语
哈勃私语