怎么样实现wordpress的enfold主题Modal弹窗效果

Modal这个element必须跟Button或tagline box结合使用才可以,因为如果modal是一辆车的话,button就是车钥匙,车必须有钥匙才可以启动。另外,弹窗也叫Popup

第一种是点击button实现弹窗效果

1. 添加modal和button

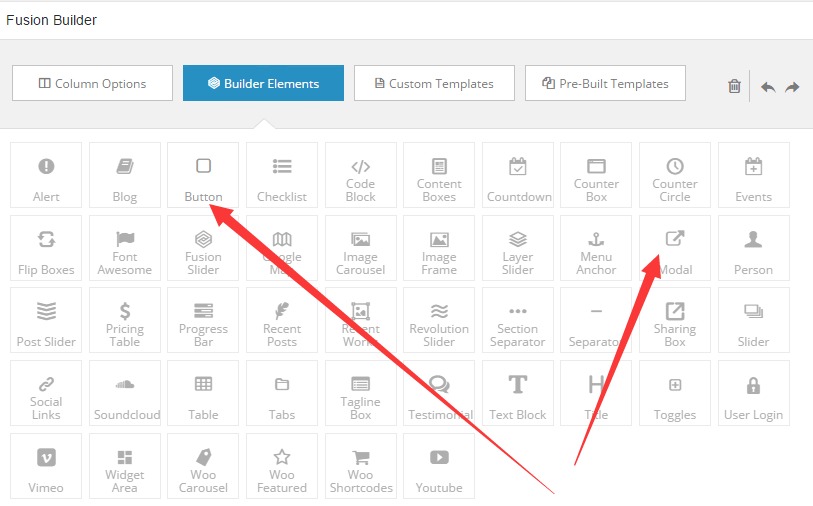
在elements里面分别点击Button和modal这两个elements (shortcode),就可以将这两个elements加入到正文中

2. 设置button

button url 留空

Button’s Text 填上文字

Modal window anchor  填上小写英文单词,如inquiry, 不要填contact form这种带空格的句子或短语

3. 设置Modal

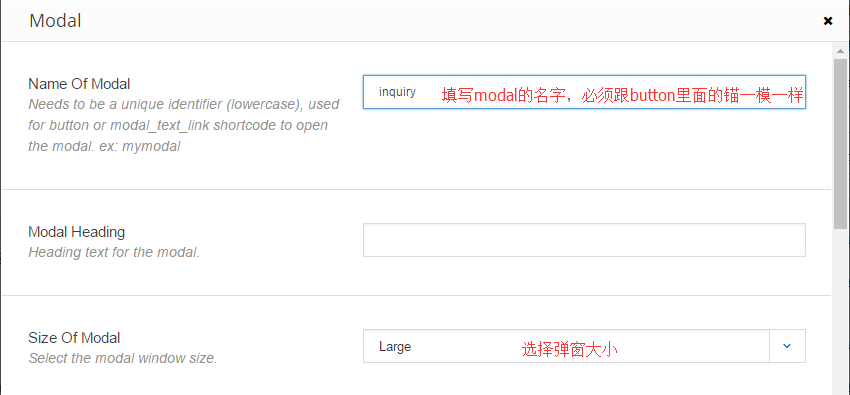
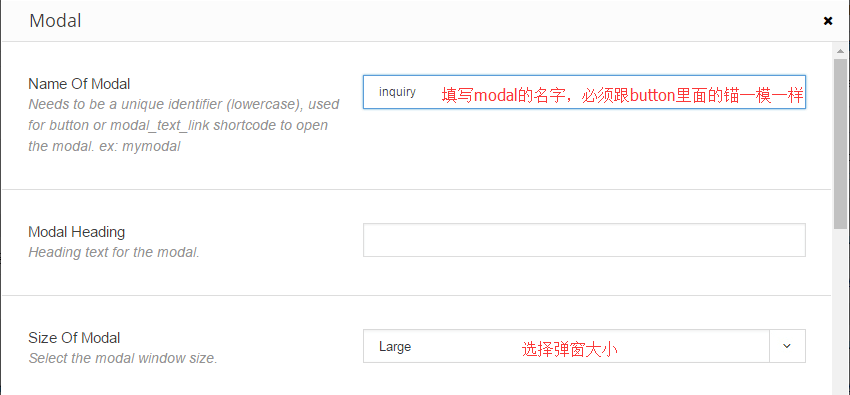
Name of modal   填上跟上面button的Modal window anchor一模一样的小写字母单词

size of modal     选择弹窗的大小

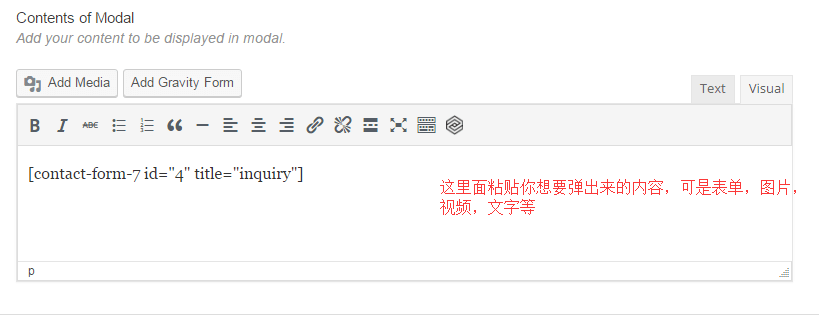
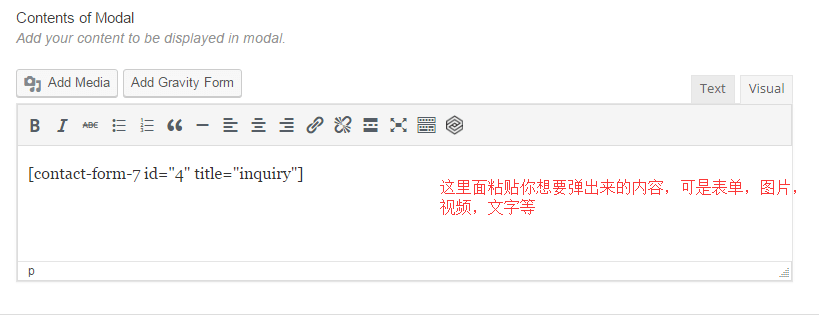
content of modal 填的是你的弹窗内容,像表单,图片,视频等,只要把相应的内容放进去,保存即可

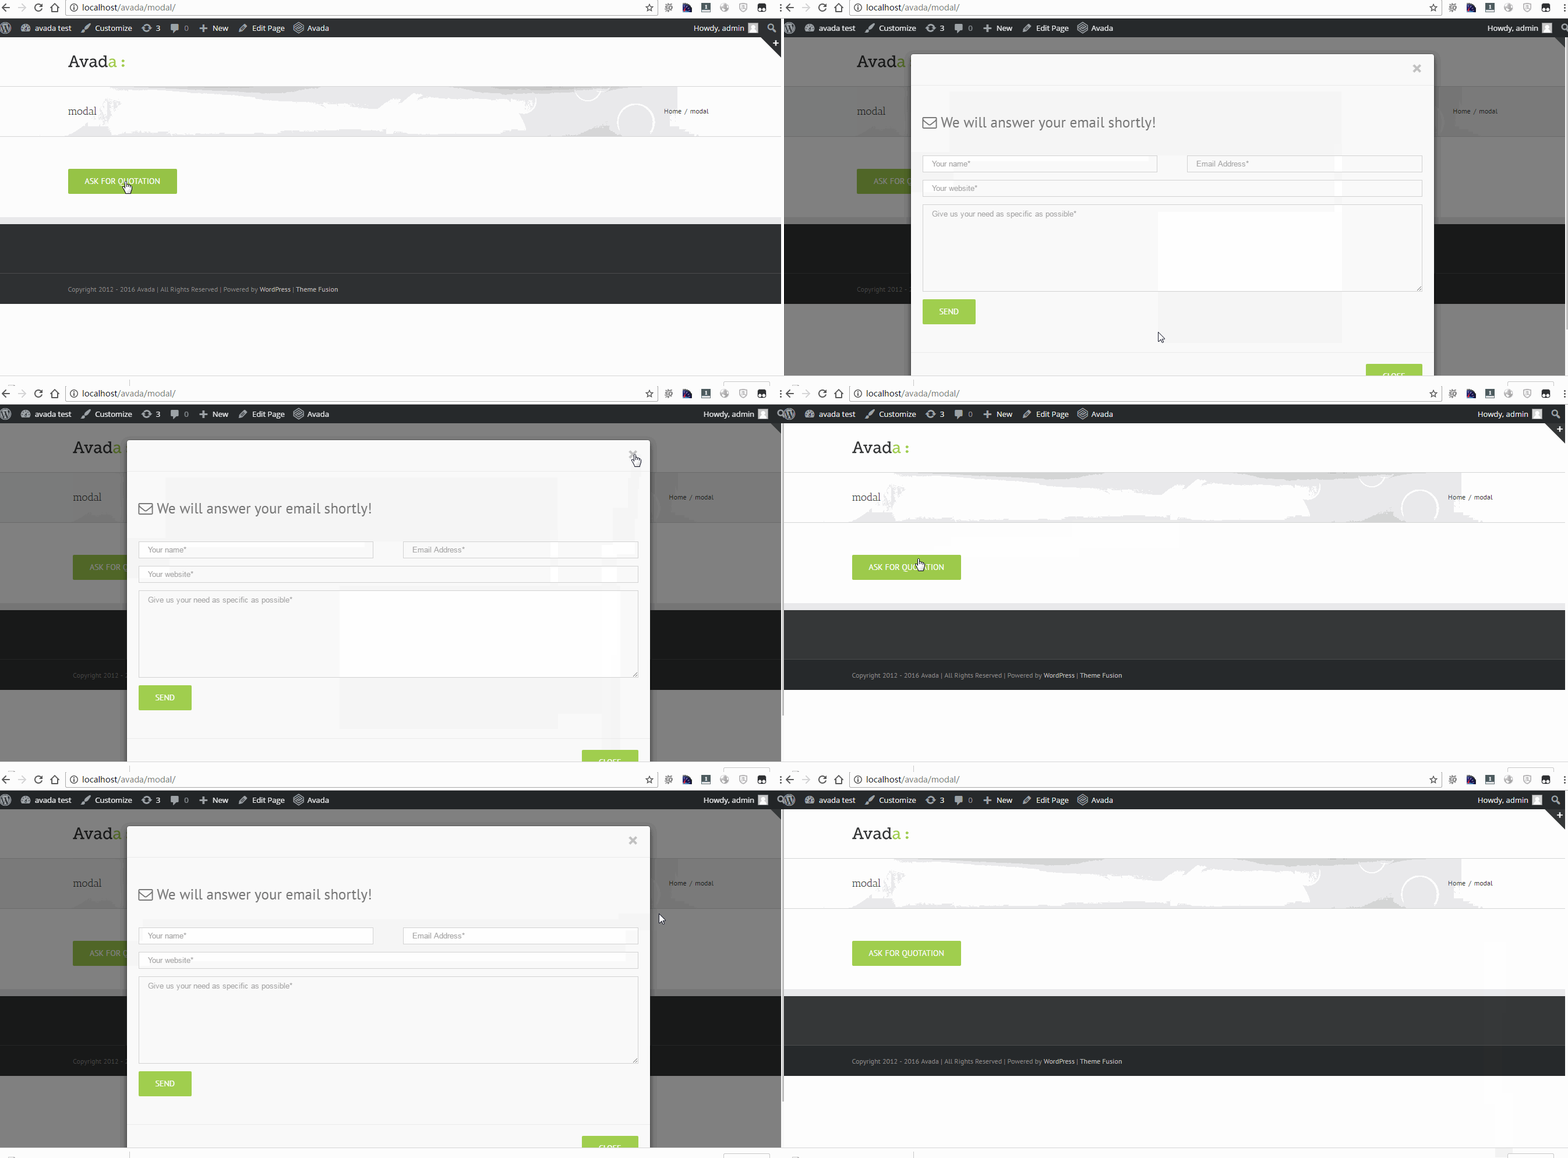
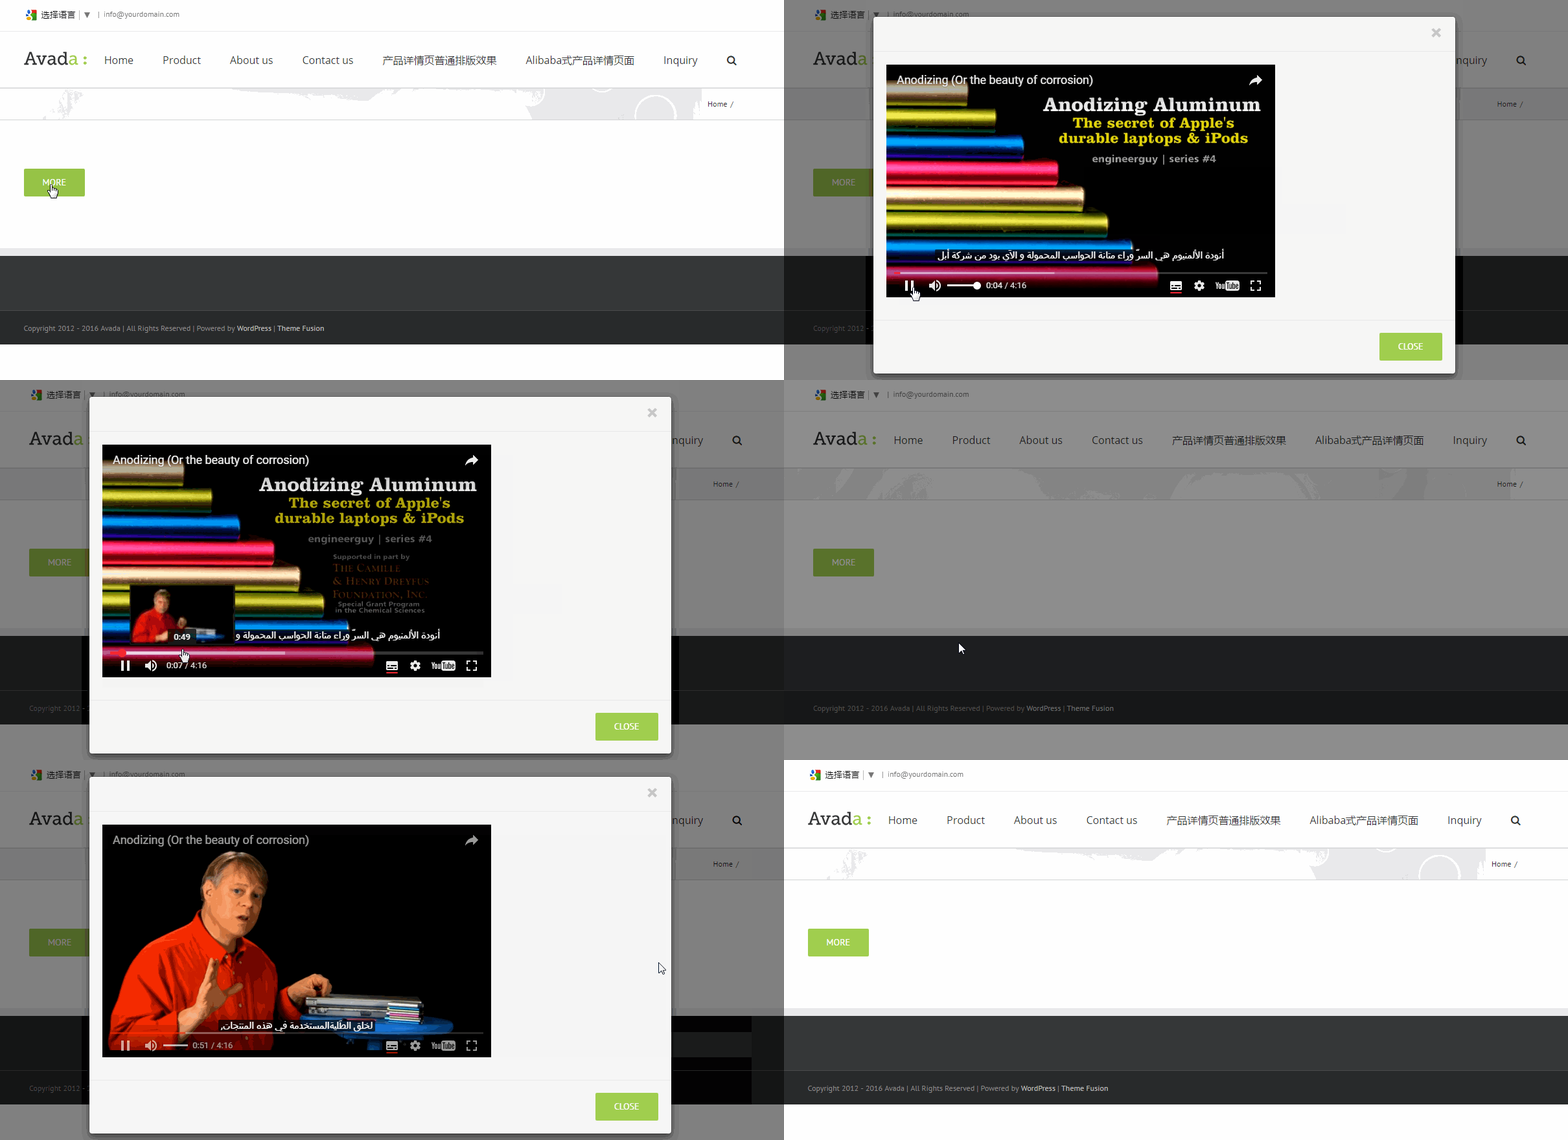
询盘表单弹窗效果如下:

视频的弹窗效果如下:

第二种是点击文字或图片实现弹窗效果

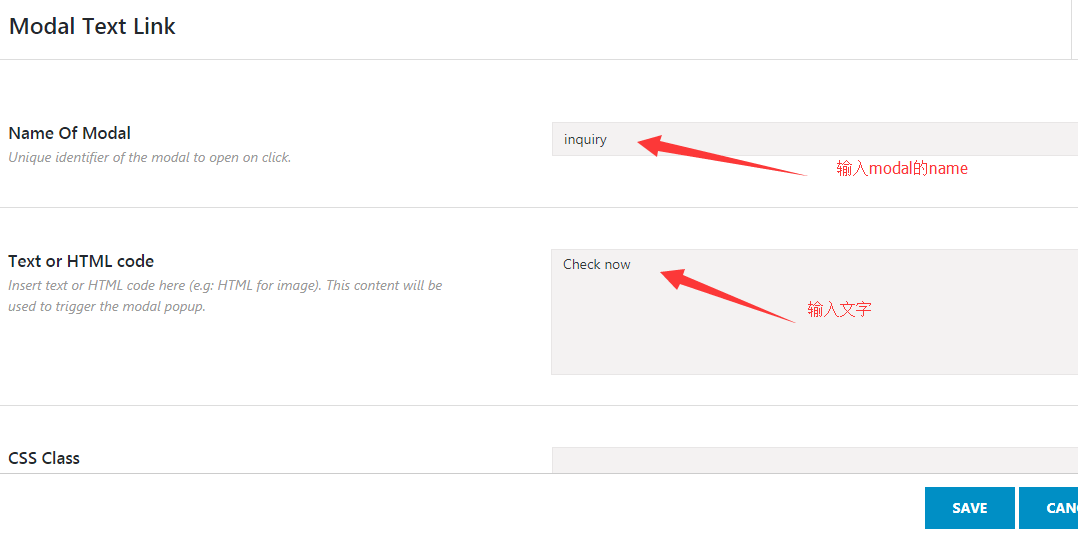
1.在element里面选择modal text link这一个,并插入到页面中

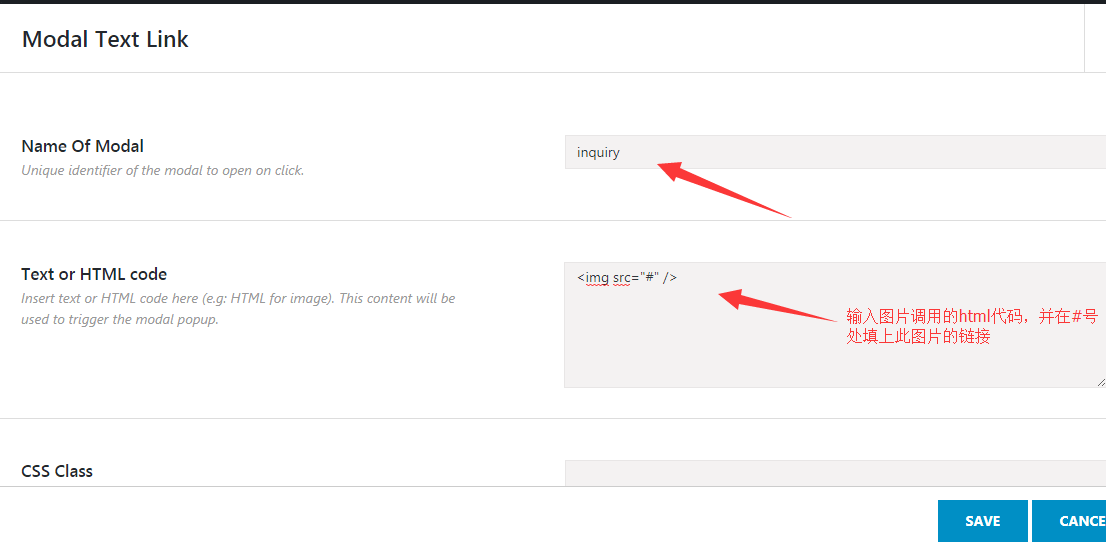
2.在name of modal中输入inquiry,不要填contact form这种带空格的句子或短语,并在text or html code中输入文字,如果想做成图片弹窗就输入图片的html代码<img src=”#” /> ,并在#处填上图片的链接

3. 插入modal这个element,并填好name of modal并填入弹窗的内容,保存刷新即可实现文字或图片的弹窗效果

Name of modal   填上跟上面一模一样的小写字母单词

size of modal     选择弹窗的大小

content of modal 填的是你的弹窗内容,像表单,图片,视频等,只要把相应的内容放进去,保存即可

nginx 反向代理 取得真实IP和域名

一、反向代理配置:

完整配置示例

(/etc/nginx/nginx.conf)     注意这个nginx.conf,可能不是默认的这个,有的人自定义了的,得根据自己配置走,反正是跟着自己的配置文件走就行了,你的设置在哪个配置文件中就去哪个配置文件中加这个:

worker_processes  1;
events {
    worker_connections  1024;
} 
http {
    include       mime.types;
    default_type  application/octet-stream;
    sendfile        on;
    keepalive_timeout  65; 

    upstream backend {             
       server 192.168.56.4;
       server 192.168.56.5;
    fair;
    } 

    server {
        listen       80;
        server_name  _; 

        location / {

        #设置主机头和客户端真实地址,以便服务器获取客户端真实IP
             proxy_set_header Host $host;
             proxy_set_header X-Real-IP $remote_addr;
             proxy_set_header REMOTE-HOST $remote_addr;
             proxy_set_header X-Forwarded-For $proxy_add_x_forwarded_for;

             #禁用缓存
             proxy_buffering off; 

             #反向代理的地址
             proxy_pass http://backend;    
        }
    } 
}

二、获取真实客户端ip

nginx反向代理后,在应用中取得的ip都是反向代理服务器的ip,取得的域名也是反向代理配置的url的域名,解决该问题,需要在nginx反向代理配置中添加一些配置信息,目的将客户端的真实ip和域名传递到应用程序中。

笔者这里加的是这样的:

server_name www.zhangsan.com;

location ^~/api/ {

 proxy_set_header Host $host;
 proxy_set_header X-Real-IP $remote_addr;
 proxy_set_header REMOTE-HOST $remote_addr;
 proxy_set_header X-Forwarded-For $proxy_add_x_forwarded_for;
 #禁用缓存
 proxy_buffering off;

proxy_pass http://localhost:9899/api/;
}
location / {

 proxy_set_header Host $host;
 proxy_set_header X-Real-IP $remote_addr;
 proxy_set_header REMOTE-HOST $remote_addr;
 proxy_set_header X-Forwarded-For $proxy_add_x_forwarded_for;
 #禁用缓存
 proxy_buffering off;

root /home/username/zhangsan_html;
 index index.html;
}

nginx反向代理配置时,一般会添加下面的配置:

proxy_set_header Host $host;
proxy_set_header X-Real-IP $remote_addr;
proxy_set_header REMOTE-HOST $remote_addr;
proxy_set_header X-Forwarded-For $proxy_add_x_forwarded_for;

其中第一行关于host的配置,是关于域名传递的配置,余下跟IP相关。

PHP中取得客户端真实IP

function getClientIP() {
$ip = "unknown";
 if (isset($_SERVER)) {
 if (isset($_SERVER["HTTP_X_FORWARDED_FOR"])) {
 $ip = $_SERVER["HTTP_X_FORWARDED_FOR"];
 } elseif (isset($_SERVER["HTTP_CLIENT_ip"])) {
 $ip = $_SERVER["HTTP_CLIENT_ip"];
 } else {
 $ip = $_SERVER["REMOTE_ADDR"];
 }
 } else {
 if (getenv('HTTP_X_FORWARDED_FOR')) {
 $ip = getenv('HTTP_X_FORWARDED_FOR');
 } elseif (getenv('HTTP_CLIENT_ip')) {
 $ip = getenv('HTTP_CLIENT_ip');
 } else {
 $ip = getenv('REMOTE_ADDR');
 }
 }
 if(trim($ip)=="::1"){
 $ip="127.0.0.1";
 }
 return $ip;
}

笔者在tp5中的用法如下:

$ip = "unknown";
 if (isset($_SERVER)) {
 if (isset($_SERVER["HTTP_X_FORWARDED_FOR"])) {
 $ip = $_SERVER["HTTP_X_FORWARDED_FOR"];
 } elseif (isset($_SERVER["HTTP_CLIENT_ip"])) {
 $ip = $_SERVER["HTTP_CLIENT_ip"];
 } else {
 $ip = $_SERVER["REMOTE_ADDR"];
 }
 } else {
 if (getenv('HTTP_X_FORWARDED_FOR')) {
 $ip = getenv('HTTP_X_FORWARDED_FOR');
 } elseif (getenv('HTTP_CLIENT_ip')) {
 $ip = getenv('HTTP_CLIENT_ip');
 } else {
 $ip = getenv('REMOTE_ADDR');
 }
 }
 if(trim($ip)=="::1"){
 $ip="127.0.0.1";
 }

获取到用户的$ip的IP后,就可以插入数据库了。

原文参考:https://www.cnblogs.com/luotingliang/p/7289811.html

[转]大前端主题DUX添加主题themebetter首页顶部样式

这里正对dux主题做一个小的首页修改,添加一个banner,在附加几个功能选项,这里的样式是仿造themebetter主题首页顶部的样式,

用过dux的都知道是wordpress的dux主题是themebetter制作开发的,虽然dux非常强大美观,但是首页还是没有和themebetter主题一样的功能样式,感觉themebetter的顶部banner样式非常好看实用,

于是这里根据美化和效果,我们来对dux进行修改,添加一个和themebetter一样的多功能顶部banner。

教程代码

首先将以下代码添加你合适的位置,无作为建议添加主题根目录下header.php最下端,当然自己喜欢那里就选那里都是一样的:

<div class="focusbanner" style="background-image:url(http://themebetter.com/static/bg/bg_04.jpg)">
 <div class="container"> <a href="javascript:;" class="signin-loader"><p class="btn btn-primary">登录 NPIE</p></a> <a href="javascript:;" class="signup-loader"><p class="btn btn-whrite">我要注册</p></a> </div>
</div>
 
<div class="container">
 <ul class="eboxx">
 <li class="eboxx-i eboxx-01">
 <h4>个性化主题</h4>
 <p>扁平化、简洁白色、多设备支持、多功能配置</p>
 <a class="btn btn-sm btn-primary" target="_blank" rel="nofollow" href="http://www.habotalk.com/">专题</a>
 <a class="btn btn-sm btn-default" target="_blank" rel="nofollow" href="http://www.habotalk.com/">查看演示</a>
 </li>
 <li class="eboxx-i eboxx-02">
 <h4>个性化主题</h4>
 <p>扁平化、简洁风格,适用于图片展示站点和个人博客</p>
 <a class="btn btn-sm btn-primary" target="_blank" rel="nofollow" href="http://www.habotalk.com/">专题</a>
 <a class="btn btn-sm btn-default" target="_blank" rel="nofollow" href="http://www.habotalk.com/">查看演示</a>
 </li>
 <li class="eboxx-i eboxx-03">
 <h4>简洁主题</h4>
 <p>大气设计,适用于企业站、行业垂直站、团队站及个人博客</p>
 <a class="btn btn-sm btn-primary" target="_blank" rel="nofollow" href="http://www.habotalk.com/">专题</a>
 <a class="btn btn-sm btn-default" target="_blank" rel="nofollow" href="http://www.habotalk.com/">查看演示</a>
 </li>
 <li class="eboxx-i eboxx-04">
 <h4>清爽主题</h4>
 <p>简洁2栏,适用于个人站点及团队博客</p>
 <a class="btn btn-sm btn-primary" target="_blank" rel="nofollow" href="http://www.habotalk.com/">专题</a>
 </li>
 <li class="eboxx-i eboxx-100">
 <h4>WordPress主题定制</h4>
 <p>完全按照您的需求量身打造,此项服务需要排期,具体请联系我们</p>
 <a class="btn btn-sm btn-danger" target="_blank" rel="nofollow" href="http://www.habotalk.com/">联系我们</a>
 </li>
 </ul>
</div>

添加CSS

注:DUX主题如果单纯添加ebox样式的话会和大前端dux主题小工具主题推荐和前段开发的样式冲突,所以这里为了不产生冲突无阻我重新定义了一个样式eboxx:

/* focusbanner habotalk.com================================================================================ */
.focusbanner {
text-align: center;
margin-bottom: 20px;
height: 200px;
background-repeat: no-repeat;
background-position: 50% 50%;
}
.focusbanner .container {
padding-top: 88px;
padding-right: 60px;
text-align: right;
}
.focusbanner .btn {
margin-left: 10px;
}
/* btn habotalk.com======================================================================================== */
.btn {
display: inline-block;
padding: 6px 15px;
margin-bottom: 0;
font-size: 14px;
font-weight: normal;
line-height: 1.42857143;
text-align: center;
white-space: nowrap;
vertical-align: middle;
-ms-touch-action: manipulation;
touch-action: manipulation;
cursor: pointer;
-webkit-user-select: none;
-moz-user-select: none;
-ms-user-select: none;
user-select: none;
background-image: none;
border: 1px solid transparent;
border-radius: 2px;
}
.btn:focus, .btn:active:focus, .btn.active:focus, .btn.focus, .btn:active.focus, .btn.active.focus {
outline: thin dotted;
outline: 5px auto -webkit-focus-ring-color;
outline-offset: -2px;
}
.btn:hover, .btn:focus, .btn.focus {
color: #333;
text-decoration: none;
}
.btn:active, .btn.active {
background-image: none;
outline: 0;
-webkit-box-shadow: inset 0 3px 5px rgba(0, 0, 0, .125);
box-shadow: inset 0 3px 5px rgba(0, 0, 0, .125);
}
.btn.disabled, .btn[disabled], fieldset[disabled] .btn {
cursor: not-allowed;
filter: alpha(opacity=65);
-webkit-box-shadow: none;
box-shadow: none;
opacity: .65;
}
a.btn.disabled, fieldset[disabled] a.btn {
pointer-events: none;
}
.btn-default {
color: #555;
background-color: #fff;
border-color: #d6d6d6;
}
.btn-default:hover, .btn-default:focus, .btn-default:active {
color: #333;
background-color: #e6e6e6;
border-color: #bbb;
}
.btn-primary {
color: #fff;
background-color: #00AAEE;
border-color: #00AAEE;
}
.btn-primary:hover, .btn-primary:focus, .btn-primary:active {
color: #fff;
background-color: #00A1EC;
border-color: #00A1EC;
}
.btn-success {
color: #fff;
background-color: #50CD7C;
border-color: #50CD7C;
}
.btn-success:hover, .btn-success:focus, .btn-success:active {
color: #fff;
background-color: #3CC76D;
border-color: #3CC76D;
}
.btn-danger {
color: #fff;
background-color: #FF8966;
border-color: #FF8966;
}
.btn-danger:hover, .btn-danger:focus, .btn-danger:active {
color: #fff;
background-color: #FF6F44;
border-color: #FF6F44;
}
.btn-whrite {
color: #555;
background-color: #fff;
border-color: #fff;
}
.btn-whrite:hover, .btn-whrite:focus, .btn-whrite:active {
color: #333;
background-color: #fff;
border-color: #fff;
}
.btn-xs {
padding: 2px 6px;
font-size: 12px;
}
.btn-sm {
padding: 4px 12px;
}
.btn-lg {
font-size: 20px;
border-radius: 4px;
padding: 10px 25px;
}
.btn-block {
width: 100%;
}
/* ebox habotalk.com======================================================================================= */
.eboxx {
overflow: hidden;
font-size: 12px;
text-align: center;
background-color: #fff;
margin-bottom: 20px;
}
.eboxx h4 {
font-size: 14px;
color: #444;
margin: 10px 0;
}
.eboxx-i {
position: relative;
float: left;
width: 20%;
padding: 20px;
background-color: #fff;
color: #777;
}
.eboxx-01, .eboxx-02, .eboxx-03, .eboxx-04 {
border-right: 2px solid #eee;
}
.eboxx-i:hover {background-color: #F9F9F9;}
.eboxx-i p {height: 36px;overflow: hidden;color: #bbb;}
@media (max-width: 1024px) {
.eboxx .btn-default {display: none;}
.eboxx h4 {height: 20px;overflow: hidden;}
}
@media (max-width: 860px) {
.eboxx .eboxx-100 {display: none;}
.eboxx-i {width: 25%;}
.eboxx-04 {border-right: none;}
}
@media (max-width: 640px) {
.eboxx-i {width: 50%;}
.eboxx-01 {border-bottom: 2px solid #eee;}
.eboxx-02 {border-right: none;border-bottom: 2px solid #eee;}
}
@media (max-width: 480px) {
.eboxx-i {padding: 10px 15px 15px;}
.eboxx h4 {margin-bottom: 0;}
.eboxx-i p {margin: 5px 0}
}

到这里就完全添加完毕了,大家可以打开自己的首页进行刷新查看了。

笔者这里写放在自己的首页的模板文件里面,就是直接放在header后面。

原文链接:https://www.wuzuowei.net/6422.html

如何让页面只能在微信端打开?

通过javascript的方式,做一个判断,这种是最简单的了。看代码:

<script type="text/javascript">
// 对浏览器的UserAgent进行正则匹配,不含有微信独有标识的则为其他浏览器
var useragent = navigator.userAgent;
if (useragent.match(/MicroMessenger/i) != 'MicroMessenger') {
// 这里警告框会阻塞当前页面继续加载
var url = window.location.href;
window.location.href = 'https://open.weixin.qq.com/connect/oauth2/authorize?appid={$_W['account']['key']}&redirect_uri='+url+'&response_type=code&scope=snsapi_base&state=YWN0PW1vZHVsZSZuYW1lPXNob3BwaW5nMiZkbz1saXN0JndlaWQ9Mg==&connect_redirect=1#wechat_redirect';
}
</script>

HTML meta标签总结,HTML5 head meta属性整理

移动前端开发中添加一些webkit专属的HTML5头部标签,帮助浏览器更好解析HTML代码,更好地将移动web前端页面表现出来。本文整理一些常用的meta标签。

<!DOCTYPE html> <!-- 使用 HTML5 doctype,不区分大小写 -->
<html lang="zh-cmn-Hans"> <!-- 更加标准的 lang 属性写法 http://zhi.hu/XyIa -->
<head>
    <!-- 声明文档使用的字符编码 -->
    <meta charset='utf-8'>
    <!-- 优先使用 IE 最新版本和 Chrome -->
    <meta http-equiv="X-UA-Compatible" content="IE=edge,chrome=1"/>
    <!-- 页面描述 -->
    <meta name="description" content="不超过150个字符"/>
    <!-- 页面关键词 -->
    <meta name="keywords" content=""/>
    <!-- 网页作者 -->
    <meta name="author" content="name, email@gmail.com"/>
    <!-- 搜索引擎抓取 -->
    <meta name="robots" content="index,follow"/>
    <!-- 为移动设备添加 viewport -->
    <meta name="viewport" content="initial-scale=1, maximum-scale=3, minimum-scale=1, user-scalable=no">
    <!-- `width=device-width` 会导致 iPhone 5 添加到主屏后以 WebApp 全屏模式打开页面时出现黑边 http://bigc.at/ios-webapp-viewport-meta.orz -->
 
    <!-- iOS 设备 begin -->
    <meta name="apple-mobile-web-app-title" content="标题">
    <!-- 添加到主屏后的标题(iOS 6 新增) -->
    <meta name="apple-mobile-web-app-capable" content="yes"/>
    <!-- 是否启用 WebApp 全屏模式,删除苹果默认的工具栏和菜单栏 -->
 
    <meta name="apple-itunes-app" content="app-id=myAppStoreID, affiliate-data=myAffiliateData, app-argument=myURL">
    <!-- 添加智能 App 广告条 Smart App Banner(iOS 6+ Safari) -->
    <meta name="apple-mobile-web-app-status-bar-style" content="black"/>
    <!-- 设置苹果工具栏颜色 -->
    <meta name="format-detection" content="telphone=no, email=no"/>
    <!-- 忽略页面中的数字识别为电话,忽略email识别 -->
    <!-- 启用360浏览器的极速模式(webkit) -->
    <meta name="renderer" content="webkit">
    <!-- 避免IE使用兼容模式 -->
    <meta http-equiv="X-UA-Compatible" content="IE=edge">
    <!-- 不让百度转码 -->
    <meta http-equiv="Cache-Control" content="no-siteapp" />
    <!-- 针对手持设备优化,主要是针对一些老的不识别viewport的浏览器,比如黑莓 -->
    <meta name="HandheldFriendly" content="true">
    <!-- 微软的老式浏览器 -->
    <meta name="MobileOptimized" content="320">
    <!-- uc强制竖屏 -->
    <meta name="screen-orientation" content="portrait">
    <!-- QQ强制竖屏 -->
    <meta name="x5-orientation" content="portrait">
    <!-- UC强制全屏 -->
    <meta name="full-screen" content="yes">
    <!-- QQ强制全屏 -->
    <meta name="x5-fullscreen" content="true">
    <!-- UC应用模式 -->
    <meta name="browsermode" content="application">
    <!-- QQ应用模式 -->
    <meta name="x5-page-mode" content="app">
    <!-- windows phone 点击无高光 -->
    <meta name="msapplication-tap-highlight" content="no">
    <!-- iOS 图标 begin -->
    <link rel="apple-touch-icon-precomposed" href="/apple-touch-icon-57x57-precomposed.png"/>
    <!-- iPhone 和 iTouch,默认 57x57 像素,必须有 -->
    <link rel="apple-touch-icon-precomposed" sizes="114x114" href="/apple-touch-icon-114x114-precomposed.png"/>
    <!-- Retina iPhone 和 Retina iTouch,114x114 像素,可以没有,但推荐有 -->
    <link rel="apple-touch-icon-precomposed" sizes="144x144" href="/apple-touch-icon-144x144-precomposed.png"/>
    <!-- Retina iPad,144x144 像素,可以没有,但推荐有 -->
    <!-- iOS 图标 end -->
 
    <!-- iOS 启动画面 begin -->
    <link rel="apple-touch-startup-image" sizes="768x1004" href="/splash-screen-768x1004.png"/>
    <!-- iPad 竖屏 768 x 1004(标准分辨率) -->
    <link rel="apple-touch-startup-image" sizes="1536x2008" href="/splash-screen-1536x2008.png"/>
    <!-- iPad 竖屏 1536x2008(Retina) -->
    <link rel="apple-touch-startup-image" sizes="1024x748" href="/Default-Portrait-1024x748.png"/>
    <!-- iPad 横屏 1024x748(标准分辨率) -->
    <link rel="apple-touch-startup-image" sizes="2048x1496" href="/splash-screen-2048x1496.png"/>
    <!-- iPad 横屏 2048x1496(Retina) -->
 
    <link rel="apple-touch-startup-image" href="/splash-screen-320x480.png"/>
    <!-- iPhone/iPod Touch 竖屏 320x480 (标准分辨率) -->
    <link rel="apple-touch-startup-image" sizes="640x960" href="/splash-screen-640x960.png"/>
    <!-- iPhone/iPod Touch 竖屏 640x960 (Retina) -->
    <link rel="apple-touch-startup-image" sizes="640x1136" href="/splash-screen-640x1136.png"/>
    <!-- iPhone 5/iPod Touch 5 竖屏 640x1136 (Retina) -->
    <!-- iOS 启动画面 end -->
 
    <!-- iOS 设备 end -->
    <meta name="msapplication-TileColor" content="#000"/>
    <!-- Windows 8 磁贴颜色 -->
    <meta name="msapplication-TileImage" content="icon.png"/>
    <!-- Windows 8 磁贴图标 -->
 
    <link rel="alternate" type="application/rss+xml" title="RSS" href="/rss.xml"/>
    <!-- 添加 RSS 订阅 -->
    <link rel="shortcut icon" type="image/ico" href="/favicon.ico"/>
    <!-- 添加 favicon icon -->

    <!-- sns 社交标签 begin -->
    <!-- 参考微博API -->
    <meta property="og:type" content="类型" />
    <meta property="og:url" content="URL地址" />
    <meta property="og:title" content="标题" />
    <meta property="og:image" content="图片" />
    <meta property="og:description" content="描述" />
    <!-- sns 社交标签 end -->
 
    <title>标题</title>
</head>

上面给出了常用的一些meta属性,下面给一个对meta使用的理解。

meta是html语言head区的一个辅助性标签。也许你认为这些代码可有可无。其实如果你能够用好meta标签,会给你带来意想不到的效果,meta标签的作用有:搜索引擎优化(seo),定义页面使用语言,自动刷新并指向新的页面,实现网页转换时的动态效果,控制页面缓冲,网页定级评价,控制网页显示的窗口等!

meta标签的组成:meta标签共有两个属性,它们分别是http-equiv属性和name属性,不同的属性又有不同的参数值,这些不同的参数值就实现了不同的网页功能。

1、name属性

name属性主要用于描述网页,与之对应的属性值为content,content中的内容主要是便于搜索引擎机器人查找信息和分类信息用的。

meta标签的name属性语法格式是:

<meta name="参数" content="具体的参数值">。

其中name属性主要有以下几种参数:

A、Keywords(关键字)

说明:keywords用来告诉搜索引擎你网页的关键字是什么。

举例:·

<meta name="keywords" content="meta总结,html meta,meta属性,meta跳转">

B、description(网站内容描述)

说明:description用来告诉搜索引擎你的网站主要内容。

举例:

<meta name="description" content="haorooms博客,html的meta总结,meta是html语言head区的一个辅助性标签。">

C、robots(机器人向导)

说明:robots用来告诉搜索机器人哪些页面需要索引,哪些页面不需要索引。

content的参数有all,none,index,noindex,follow,nofollow。默认是all。

举例:

<meta name="robots" content="none">

具体参数如下:

信息参数为all:文件将被检索,且页面上的链接可以被查询;

信息参数为none:文件将不被检索,且页面上的链接不可以被查询;

信息参数为index:文件将被检索;

信息参数为follow:页面上的链接可以被查询;

信息参数为noindex:文件将不被检索,但页面上的链接可以被查询;

信息参数为nofollow:文件将被检索,但页面上的链接不可以被查询;

D、author(作者)

说明:标注网页的作者

举例:

<meta name="author" content="root,root@xxxx.com">

E、generator

<meta name="generator" content="信息参数"/>

meta标签的generator的信息参数,代表说明网站的采用的什么软件制作。

F、COPYRIGHT

<META NAME="COPYRIGHT" CONTENT="信息参数">

meta标签的COPYRIGHT的信息参数,代表说明网站版权信息。

G、revisit-after

<META name="revisit-after" CONTENT="7days">

revisit-after代表网站重访,7days代表7天,依此类推。

2、http-equiv属性

http-equiv顾名思义,相当于http的文件头作用,它可以向浏览器传回一些有用的信息,以帮助正确和精确地显示网页内容,与之对应的属性值为content,content中的内容其实就是各个参数的变量值。

meta标签的http-equiv属性语法格式是:

<meta http-equiv="参数" content="参数变量值">;

其中http-equiv属性主要有以下几种参数:

A、Expires(期限)

说明:可以用于设定网页的到期时间。一旦网页过期,必须到服务器上重新传输。

用法:

<meta http-equiv="expires" content="Fri,12Jan200118:18:18GMT">

注意:必须使用GMT的时间格式。

B、Pragma(cache模式)

说明:禁止浏览器从本地计算机的缓存中访问页面内容。

用法:

<meta http-equiv="Pragma" content="no-cache">

注意:这样设定,访问者将无法脱机浏览。

C、Refresh(刷新)

说明:自动刷新并指向新页面。

用法:

<meta http-equiv="Refresh" content="2;URL=http://www.haorooms.com"> //(注意后面的引号,分别在秒数的前面和网址的后面)

注意:其中的2是指停留2秒钟后自动刷新到URL网址。

D、Set-Cookie(cookie设定)

说明:如果网页过期,那么存盘的cookie将被删除。

用法:

<meta http-equiv="Set-Cookie" content="cookie value=xxx;expires=Friday,12-Jan-200118:18:18GMT;path=/">

注意:必须使用GMT的时间格式。

E、Window-target(显示窗口的设定)

说明:强制页面在当前窗口以独立页面显示。

用法:

<meta http-equiv="Window-target" content="_top">

注意:用来防止别人在框架里调用自己的页面。

F、content-Type(显示字符集的设定)

说明:设定页面使用的字符集。

用法:

<meta http-equiv="content-Type" content="text/html;charset=gb2312">

具体如下:

meta标签的charset的信息参数如GB2312时,代表说明网站是采用的编码是简体中文;

meta标签的charset的信息参数如BIG5时,代表说明网站是采用的编码是繁体中文;

meta标签的charset的信息参数如iso-2022-jp时,代表说明网站是采用的编码是日文;

meta标签的charset的信息参数如ks_c_5601时,代表说明网站是采用的编码是韩文;

meta标签的charset的信息参数如ISO-8859-1时,代表说明网站是采用的编码是英文;

meta标签的charset的信息参数如UTF-8时,代表世界通用的语言编码;

G、content-Language(显示语言的设定)

用法:

<meta http-equiv="Content-Language" content="zh-cn"/>

H、Cache-Control指定请求和响应遵循的缓存机制。

Cache-Control指定请求和响应遵循的缓存机制。在请求消息或响应消息中设置Cache-Control并不会修改另一个消息处理过程中的缓存处理过程。请求时的缓存指令包括no-cache、no-store、max-age、max-stale、min-fresh、on

ly-if-cached,响应消息中的指令包括public、private、no-cache、no-store、no-transform、must-revalidate、proxy-revalidate、max-age。各个消息中的指令含义如下

Public指示响应可被任何缓存区缓存

Private指示对于单个用户的整个或部分响应消息,不能被共享缓存处理。这允许服务器仅仅描述当用户的部分响应消息,此响应消息对于其他用户的请求无效

no-cache指示请求或响应消息不能缓存

no-store用于防止重要的信息被无意的发布。在请求消息中发送将使得请求和响应消息都不使用缓存。

max-age指示客户机可以接收生存期不大于指定时间(以秒为单位)的响应

min-fresh指示客户机可以接收响应时间小于当前时间加上指定时间的响应

max-stale指示客户机可以接收超出超时期间的响应消息。如果指定max-stale消息的值,那么客户机可以接收超出超时期指定值之内的响应消息。

J、http-equiv=”imagetoolbar”

<meta http-equiv="imagetoolbar" content="false"/>

指定是否显示图片工具栏,当为false代表不显示,当为true代表显示。

K、Content-Script-Type

<Meta http-equiv="Content-Script-Type" Content="text/javascript">

W3C网页规范,指明页面中脚本的类型。

HTML < base > 标签

为页面上所有链接指定默认打开方式:

例如:

<base target="_self">

指定页面中所有标签都是本页打开!

原文链接:http://caibaojian.com/mobile-meta.html

[转]实用.htaccess用法大全.htaccess使用详解

这里收集的是各种实用的 .htaccess 代码片段,你能想到的用法几乎全在这里。 .htaccess使用详解

免责声明: 虽然将这些代码片段直接拷贝到你的 .htaccess 文件里,绝大多数情况下都是好用的,但也有极个别情况需要你修改某些地方才行。风险自负。

重要提示: Apache 2.4 有不兼容的修改,特别是在访问配置控制方面。详细信息请参考这篇更新文档以及这篇文章

目录:

重新和重定向

注意:首先需要服务器安装和启用mod_rewrite模块。

强制 www

RewriteEngine on
RewriteCond %{HTTP_HOST} ^example\.com [NC]
RewriteRule ^(.*)$ http://www.example.com/$1 [L,R=301,NC]

强制 www通用方法

RewriteCond %{HTTP_HOST} !^$
RewriteCond %{HTTP_HOST} !^www\. [NC]
RewriteCond %{HTTPS}s ^on(s)|
RewriteRule ^ http%1://www.%{HTTP_HOST}%{REQUEST_URI} [R=301,L]

这种方法可以使用在任何网站中。 Source

强制 non-www

究竟是WWW好,还是non-www好,没有定论,如果你喜欢不带www的,可以使用下面的脚本:

RewriteEngine on
RewriteCond %{HTTP_HOST} ^www\.example\.com [NC]
RewriteRule ^(.*)$ http://example.com/$1 [L,R=301]

强制 non-www通用方法

RewriteEngine on
RewriteCond %{HTTP_HOST} ^www\.
RewriteCond %{HTTPS}s ^on(s)|off
RewriteCond http%1://%{HTTP_HOST} ^(https?://)(www\.)?(.+)$
RewriteRule ^ %1%3%{REQUEST_URI} [R=301,L]

强制 HTTPS

RewriteEngine on
RewriteCond %{HTTPS} !on
RewriteRule (.*) https://%{HTTP_HOST}%{REQUEST_URI}

# Note: It's also recommended to enable HTTP Strict Transport Security (HSTS) 
# on your HTTPS website to help prevent man-in-the-middle attacks.
# See https://developer.mozilla.org/en-US/docs/Web/Security/HTTP_strict_transport_security
<IfModule mod_headers.c>
    Header always set Strict-Transport-Security "max-age=31536000; includeSubDomains"
</IfModule>

强制 HTTPS 通过代理

如果你使用了代理,这种方法对你很有用。

RewriteCond %{HTTP:X-Forwarded-Proto} !https
RewriteRule (.*) https://%{HTTP_HOST}%{REQUEST_URI}

强制添加末尾斜杠

RewriteCond %{REQUEST_URI} /+[^\.]+$
RewriteRule ^(.+[^/])$ %{REQUEST_URI}/ [R=301,L]

取掉末尾斜杠

RewriteCond %{REQUEST_FILENAME} !-d
RewriteRule ^(.*)/$ /$1 [R=301,L]

重定向到一个页面

Redirect 301 /oldpage.html http://www.example.com/newpage.html
Redirect 301 /oldpage2.html http://www.example.com/folder/

Source

目录别名

RewriteEngine On
RewriteRule ^source-directory/(.*) target-directory/$1

脚本别名

FallbackResource /index.fcgi

This example has an index.fcgi file in some directory, and any requests within that directory that fail to resolve a filename/directory will be sent to the index.fcgi script. It’s good if you wantbaz.foo/some/cool/path to be handled by baz.foo/index.fcgi (which also supports requests to baz.foo) while maintaining baz.foo/css/style.css and the like. Get access to the original path from the PATH_INFO environment variable, as exposed to your scripting environment.

RewriteEngine On
RewriteRule ^$ index.fcgi/ [QSA,L]
RewriteCond %{REQUEST_FILENAME} !-f
RewriteCond %{REQUEST_FILENAME} !-d
RewriteRule ^(.*)$ index.fcgi/$1 [QSA,L]

This is a less efficient version of the FallbackResource directive (because using mod_rewrite is more complex than just handling theFallbackResource directive), but it’s also more flexible.

重定向整个网站

Redirect 301 / http://newsite.com/

This way does it with links intact. That iswww.oldsite.com/some/crazy/link.html will becomewww.newsite.com/some/crazy/link.html. This is extremely helpful when you are just “moving” a site to a new domain. Source

干净的URL

This snippet lets you use “clean” URLs — those without a PHP extension, e.g. example.com/users instead of example.com/users.php.

RewriteEngine On
RewriteCond %{SCRIPT_FILENAME} !-d
RewriteRule ^([^.]+)$ $1.php [NC,L]

Source

Security

拒绝所有访问

## Apache 2.2
Deny from all

## Apache 2.4
# Require all denied

But wait, this will lock you out from your content as well! Thus introducing…

拒绝所有访问(排除部分)

## Apache 2.2
Order deny,allow
Deny from all
Allow from xxx.xxx.xxx.xxx

## Apache 2.4
# Require all denied
# Require ip xxx.xxx.xxx.xxx

xxx.xxx.xxx.xxx is your IP. If you replace the last three digits with 0/12 for example, this will specify a range of IPs within the same network, thus saving you the trouble to list all allowed IPs separately. Source

Now of course there’s a reversed version:

屏蔽爬虫/恶意访问

## Apache 2.2
Order deny,allow
Allow from all
Deny from xxx.xxx.xxx.xxx
Deny from xxx.xxx.xxx.xxy

## Apache 2.4
# Require all granted
# Require not ip xxx.xxx.xxx.xxx
# Require not ip xxx.xxx.xxx.xxy

保护隐藏文件和目录

Hidden files and directories (those whose names start with a dot .) should most, if not all, of the time be secured. For example: .htaccess,.htpasswd.git.hg

RewriteCond %{SCRIPT_FILENAME} -d [OR]
RewriteCond %{SCRIPT_FILENAME} -f
RewriteRule "(^|/)\." - [F]

Alternatively, you can just raise a Not
Found
 error, giving the attacker dude no clue:

RedirectMatch 404 /\..*$

保护备份文件和源代码文件

These files may be left by some text/html editors (like Vi/Vim) and pose a great security danger if exposed to public.

<FilesMatch "(\.(bak|config|dist|fla|inc|ini|log|psd|sh|sql|swp)|~)$">
    ## Apache 2.2
    Order allow,deny
    Deny from all
    Satisfy All

    ## Apache 2.4
    # Require all denied
</FilesMatch>

Source

禁止目录浏览

Options All -Indexes

禁止图片盗链

RewriteEngine on
# Remove the following line if you want to block blank referrer too
RewriteCond %{HTTP_REFERER} !^$

RewriteCond %{HTTP_REFERER} !^http(s)?://(.+\.)?example.com [NC]
RewriteRule \.(jpg|jpeg|png|gif|bmp)$ - [NC,F,L]

# If you want to display a "blocked" banner in place of the hotlinked image, 
# replace the above rule with:
# RewriteRule \.(jpg|jpeg|png|gif|bmp) http://example.com/blocked.png [R,L]

禁止图片盗链(指定域名)

Sometimes you want to 禁止图片盗链 from some bad guys only.

RewriteEngine on
RewriteCond %{HTTP_REFERER} ^http(s)?://(.+\.)?badsite\.com [NC,OR]
RewriteCond %{HTTP_REFERER} ^http(s)?://(.+\.)?badsite2\.com [NC,OR]
RewriteRule \.(jpg|jpeg|png|gif)$ - [NC,F,L]

# If you want to display a "blocked" banner in place of the hotlinked image, 
# replace the above rule with:
# RewriteRule \.(jpg|jpeg|png|gif|bmp) http://example.com/blocked.png [R,L]

密码保护目录

First you need to create a .htpasswd file somewhere in the system:

htpasswd -c /home/fellowship/.htpasswd boromir

Then you can use it for authentication:

AuthType Basic
AuthName "One does not simply"
AuthUserFile /home/fellowship/.htpasswd
Require valid-user

密码保护文件

AuthName "One still does not simply"
AuthType Basic
AuthUserFile /home/fellowship/.htpasswd

<Files "one-ring.o">
Require valid-user
</Files>

<FilesMatch ^((one|two|three)-rings?\.o)$>
Require valid-user
</FilesMatch>

通过Referrer过滤访客

This denies access for all users who are coming from (referred by) a specific domain.
Source

RewriteEngine on
# Options +FollowSymlinks
RewriteCond %{HTTP_REFERER} somedomain\.com [NC,OR]
RewriteCond %{HTTP_REFERER} anotherdomain\.com
RewriteRule .* - [F]

防止被别的网页嵌套

This prevents the website to be framed (i.e. put into an iframe tag), when still allows framing for a specific URI.

SetEnvIf Request_URI "/starry-night" allow_framing=true
Header set X-Frame-Options SAMEORIGIN env=!allow_framing

Performance

压缩文件

<IfModule mod_deflate.c>

    # 强制 compression for mangled headers.
    # http://developer.yahoo.com/blogs/ydn/posts/2010/12/pushing-beyond-gzipping
    <IfModule mod_setenvif.c>
        <IfModule mod_headers.c>
            SetEnvIfNoCase ^(Accept-EncodXng|X-cept-Encoding|X{15}|~{15}|-{15})$ ^((gzip|deflate)\s*,?\s*)+|[X~-]{4,13}$ HAVE_Accept-Encoding
            RequestHeader append Accept-Encoding "gzip,deflate" env=HAVE_Accept-Encoding
        </IfModule>
    </IfModule>

    # Compress all output labeled with one of the following MIME-types
    # (for Apache versions below 2.3.7, you don't need to enable `mod_filter`
    #  and can remove the `<IfModule mod_filter.c>` and `</IfModule>` lines
    #  as `AddOutputFilterByType` is still in the core directives).
    <IfModule mod_filter.c>
        AddOutputFilterByType DEFLATE application/atom+xml \
                                      application/javascript \
                                      application/json \
                                      application/rss+xml \
                                      application/vnd.ms-fontobject \
                                      application/x-font-ttf \
                                      application/x-web-app-manifest+json \
                                      application/xhtml+xml \
                                      application/xml \
                                      font/opentype \
                                      image/svg+xml \
                                      image/x-icon \
                                      text/css \
                                      text/html \
                                      text/plain \
                                      text/x-component \
                                      text/xml
    </IfModule>

</IfModule>

Source

设置过期头信息

Expires headers tell the browser whether they should request a specific file from the server or just grab it from the cache. It is advisable to set static content’s expires headers to something far in the future.
If you don’t control versioning with filename-based cache busting, consider lowering the cache time for resources like CSS and JS to something like 1 week. Source

<IfModule mod_expires.c>
    ExpiresActive on
    ExpiresDefault                                      "access plus 1 month"

  # CSS
    ExpiresByType text/css                              "access plus 1 year"

  # Data interchange
    ExpiresByType application/json                      "access plus 0 seconds"
    ExpiresByType application/xml                       "access plus 0 seconds"
    ExpiresByType text/xml                              "access plus 0 seconds"

  # Favicon (cannot be renamed!)
    ExpiresByType image/x-icon                          "access plus 1 week"

  # HTML components (HTCs)
    ExpiresByType text/x-component                      "access plus 1 month"

  # HTML
    ExpiresByType text/html                             "access plus 0 seconds"

  # JavaScript
    ExpiresByType application/javascript                "access plus 1 year"

  # Manifest files
    ExpiresByType application/x-web-app-manifest+json   "access plus 0 seconds"
    ExpiresByType text/cache-manifest                   "access plus 0 seconds"

  # Media
    ExpiresByType audio/ogg                             "access plus 1 month"
    ExpiresByType image/gif                             "access plus 1 month"
    ExpiresByType image/jpeg                            "access plus 1 month"
    ExpiresByType image/png                             "access plus 1 month"
    ExpiresByType video/mp4                             "access plus 1 month"
    ExpiresByType video/ogg                             "access plus 1 month"
    ExpiresByType video/webm                            "access plus 1 month"

  # Web feeds
    ExpiresByType application/atom+xml                  "access plus 1 hour"
    ExpiresByType application/rss+xml                   "access plus 1 hour"

  # Web fonts
    ExpiresByType application/font-woff2                "access plus 1 month"
    ExpiresByType application/font-woff                 "access plus 1 month"
    ExpiresByType application/vnd.ms-fontobject         "access plus 1 month"
    ExpiresByType application/x-font-ttf                "access plus 1 month"
    ExpiresByType font/opentype                         "access plus 1 month"
    ExpiresByType image/svg+xml                         "access plus 1 month"
</IfModule>

关闭eTags标志

By removing the ETag header, you disable caches and browsers from being able to validate files, so they are forced to rely on your Cache-Control and Expires header. Source

<IfModule mod_headers.c>
    Header unset ETag
</IfModule>
FileETag None

Miscellaneous

设置PHP变量

php_value <key> <val>

# For example:
php_value upload_max_filesize 50M
php_value max_execution_time 240

Custom Error Pages

ErrorDocument 500 "Houston, we have a problem."
ErrorDocument 401 http://error.example.com/mordor.html
ErrorDocument 404 /errors/halflife3.html

强制下载

Sometimes you want to 强制 the browser to download some content instead of displaying it.

<Files *.md>
    ForceType application/octet-stream
    Header set Content-Disposition attachment
</Files>

Now there is a yang to this yin:

阻止下载

Sometimes you want to 强制 the browser to display some content instead of downloading it.

<FilesMatch "\.(tex|log|aux)$">
    Header set Content-Type text/plain
</FilesMatch>

运行跨域字体引用

CDN-served webfonts might not work in Firefox or IE due to CORS. This snippet solves the problem.

<IfModule mod_headers.c>
    <FilesMatch "\.(eot|otf|ttc|ttf|woff|woff2)$">
        Header set Access-Control-Allow-Origin "*"
    </FilesMatch>
</IfModule>

Source

Auto UTF-8 Encode

Your text content should always be UTF-8 encoded, no?

# Use UTF-8 encoding for anything served text/plain or text/html
AddDefaultCharset utf-8

# 强制 UTF-8 for a number of file formats
AddCharset utf-8 .atom .css .js .json .rss .vtt .xml

Source

切换PHP版本

If you’re on a shared host, chances are there are more than one version of PHP installed, and sometimes you want a specific version for your website. For example, Laravel requires PHP >= 5.4. The following snippet should switch the PHP version for you.

AddHandler application/x-httpd-php55 .php

# Alternatively, you can use AddType
AddType application/x-httpd-php55 .php

禁止IE兼容视图

Compatibility View in IE may affect how some websites are displayed. The following snippet should 强制 IE to use the Edge Rendering Engine and disable the Compatibility View.

<IfModule mod_headers.c>
    BrowserMatch MSIE is-msie
    Header set X-UA-Compatible IE=edge env=is-msie
</IfModule>

支持WebP图片格式

If WebP images are supported and an image with a .webp extension and the same name is found at the same place as the jpg/png image that is going to be served, then the WebP image is served instead.

RewriteEngine On
RewriteCond %{HTTP_ACCEPT} image/webp
RewriteCond %{DOCUMENT_ROOT}/$1.webp -f
RewriteRule (.+)\.(jpe?g|png)$ $1.webp [T=image/webp,E=accept:1]