 哈勃私语
哈勃私语Plecost WordPress Fingerprinting Tool:
Plecost是一款非常棒的wordpress安全检测工具,你可以在backtrack、backbox和blackubuntu中找到它。Plecost包含一个较全面的插件数据库并能检查出wordpress是否存在CVE发布的漏洞。
Plecost可以在两种模式下运行,一种是通过一个特定URL作为目标,一种是通过google搜索多个结果。我们这里举例的模式是前者,即一个特定的url。
根据plecost官网的介绍,说得很详细了,我这里粘贴下:
Plecost
![]()
Plecost: WordPress vulnerabilities finder
| Code | https://github.com/iniqua/plecost/tree/python3 |
|---|---|
| Issues | https://github.com/iniqua/plecost/tree/python3/issues |
| Python version | Python 3 |
What’s Plecost?
Plecost is a vulnerability fingerprinting and vulnerability finder for WordPress blog engine.
Why?
There are a huge number of WordPress around the world. Most of them are exposed to be attacked and be converted into a virus, malware or illegal porn provider, without the knowledge of the blog owner.
This project try to help sysadmins and blog’s owners to make a bit secure their WordPress.
What’s new?
This Plecost 3 version, add a lot of new features and fixes, like:
- Fixed a lot of bugs.
- New engine: without threads or any dependencies, but run more faster. We’ll used python 3 asyncio and non-blocking connections. Also consume less memory. Incredible, right? 🙂
- Changed CVE update system and storage: Now Plecost get vulnerabilities directly from NIST and create a local SQLite data base with filtered information for WordPress and theirs plugins.
- WordPress vulnerabilities: Now Plecost also manage WordPress Vulnerabilities (not only for the Plugins).
- Add local vulnerability database are queryable. You can consult the vulnerabilities for a concrete wordpress or plugins without, using the local database.
You can read entire list in CHANGELOG file.
Installation
Install Plecost is so easy:
|
1
|
$ python3 -m pip install plecost
|
这里根据我们电脑安装的python而不同,如果我们安装的是python2的话,那么就是
|
1
|
$ python -m pip install plecost
|
如果是在linux上运行的话,可能需要使用sudo
Remember that Plecost3 only runs in Python 3.
Quick start
Scan a web site si so simple:
|
1
|
$ plecost http://SITE.com
|
A bit complex scan: increasing verbosity exporting results in JSON format and XML:
JSON
|
1
|
$ plecost -v http://SITE.com -o results.json
|
XML
|
1
|
$ plecost -v http://SITE.com -o results.xml
|
Advanced scan options
No check WordPress version, only for plugins:
|
1
|
$ plecost -nc http://SITE.com
|
Force scan, even if not WordPress was detected:
|
1
|
$ plecost -f http://SITE.com
|
Display only the short banner:
|
1
|
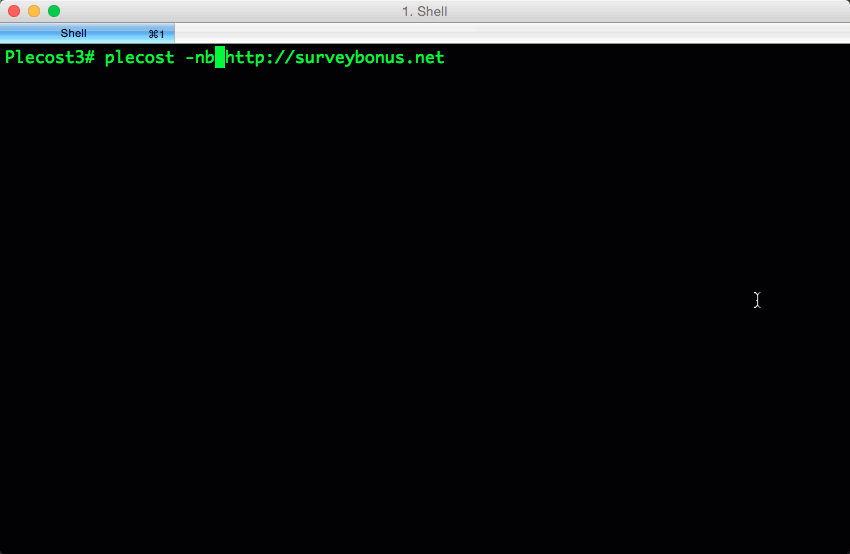
$ plecost -nb http://SITE.com
|
List available wordlists:
|
1
2
3
4
5
6
7
8
9
10
11
|
$ plecost -nb -l
// Plecost – WordPress finger printer Tool – v1.0.0
Available word lists:
1 – plugin_list_10.txt
2 – plugin_list_100.txt
3 – plugin_list_1000.txt
4 – plugin_list_250.txt
5 – plugin_list_50.txt
6 – plugin_list_huge.txt
|
Select a wordlist in the list:
|
1
|
$ plecost -nb -w plugin_list_10.txt http://SITE.com
|
Increasing concurrency (USE THIS OPTION WITH CAUTION. CAN SHUTDOWN TESTED SITE!)
|
1
|
$ plecost –concurrency 10 http://SITE.com
|
Or…
|
1
|
$ plecost -c 10 http://SITE.com
|
For more options, consult the –help command:
|
1
|
$ plecost -h
|
接下来我们使用
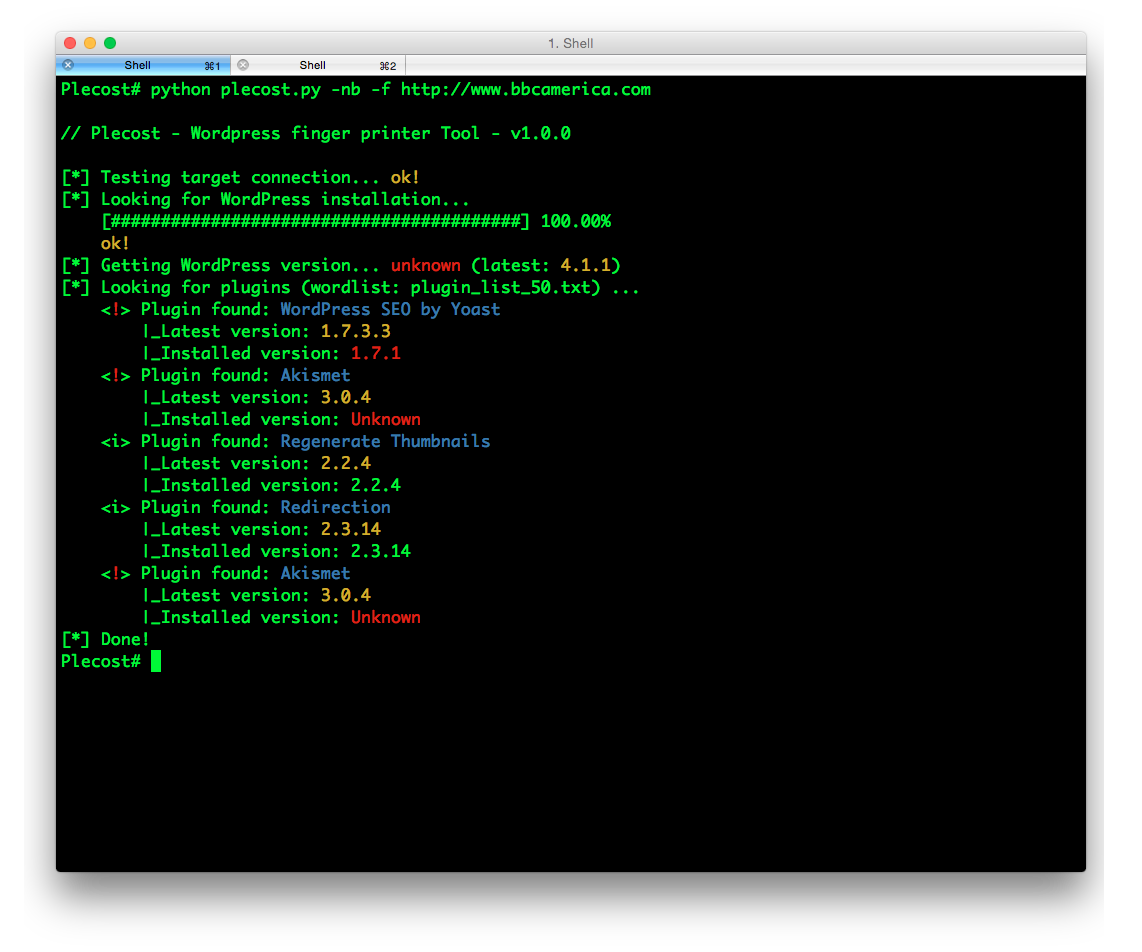
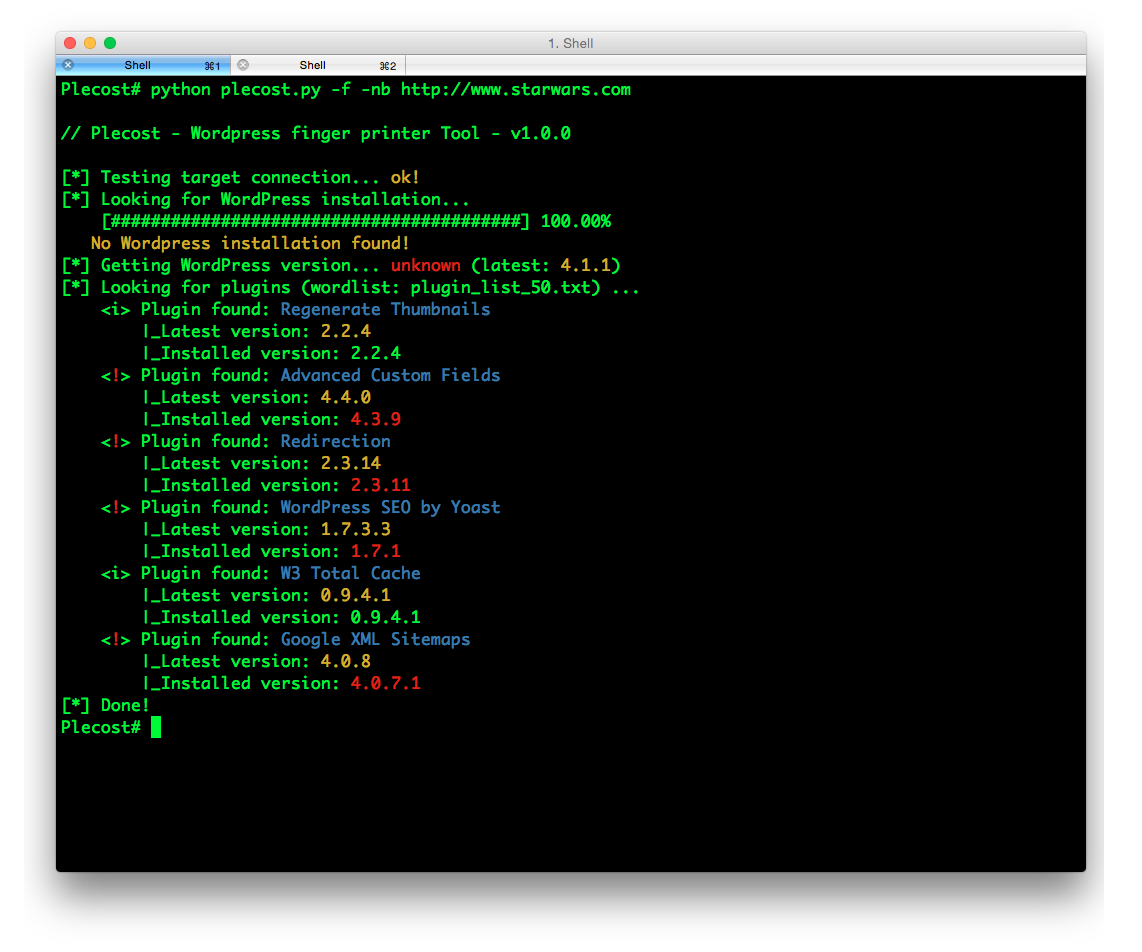
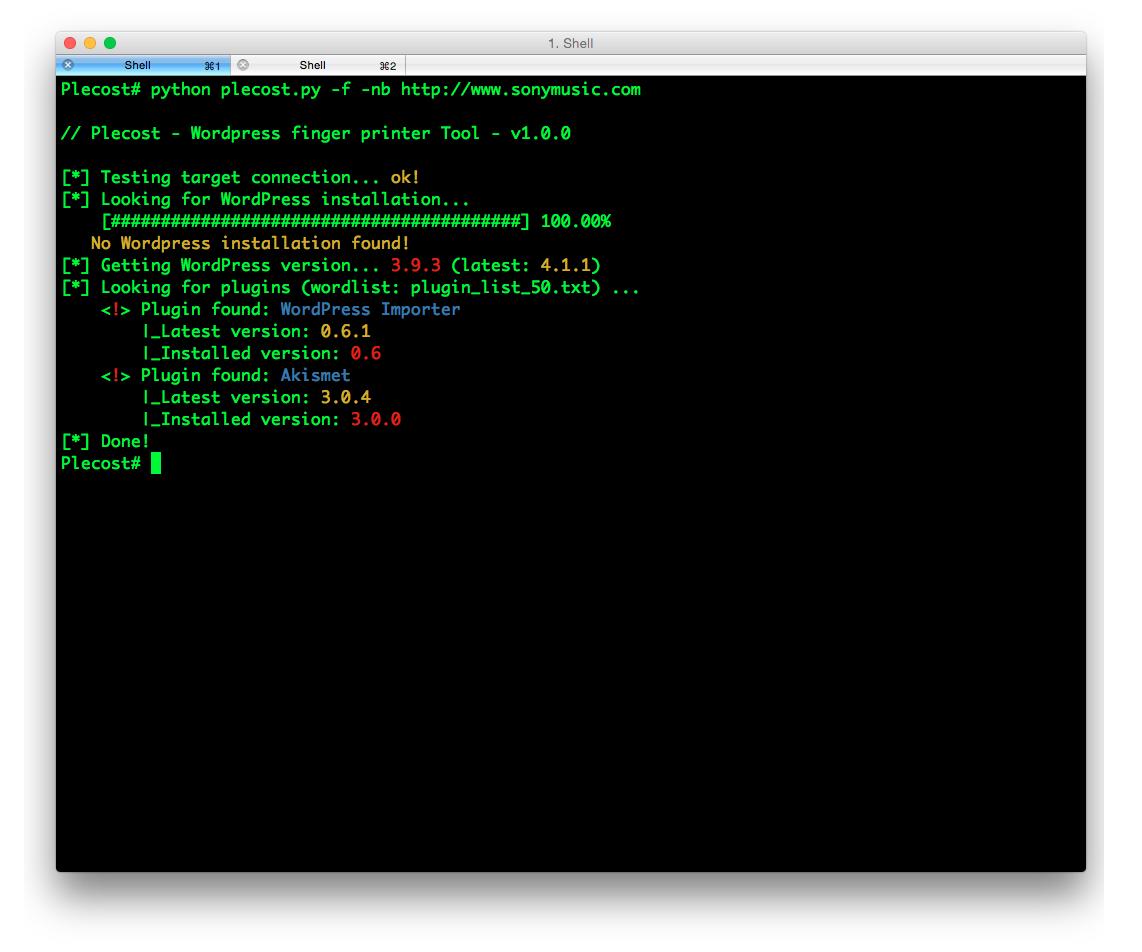
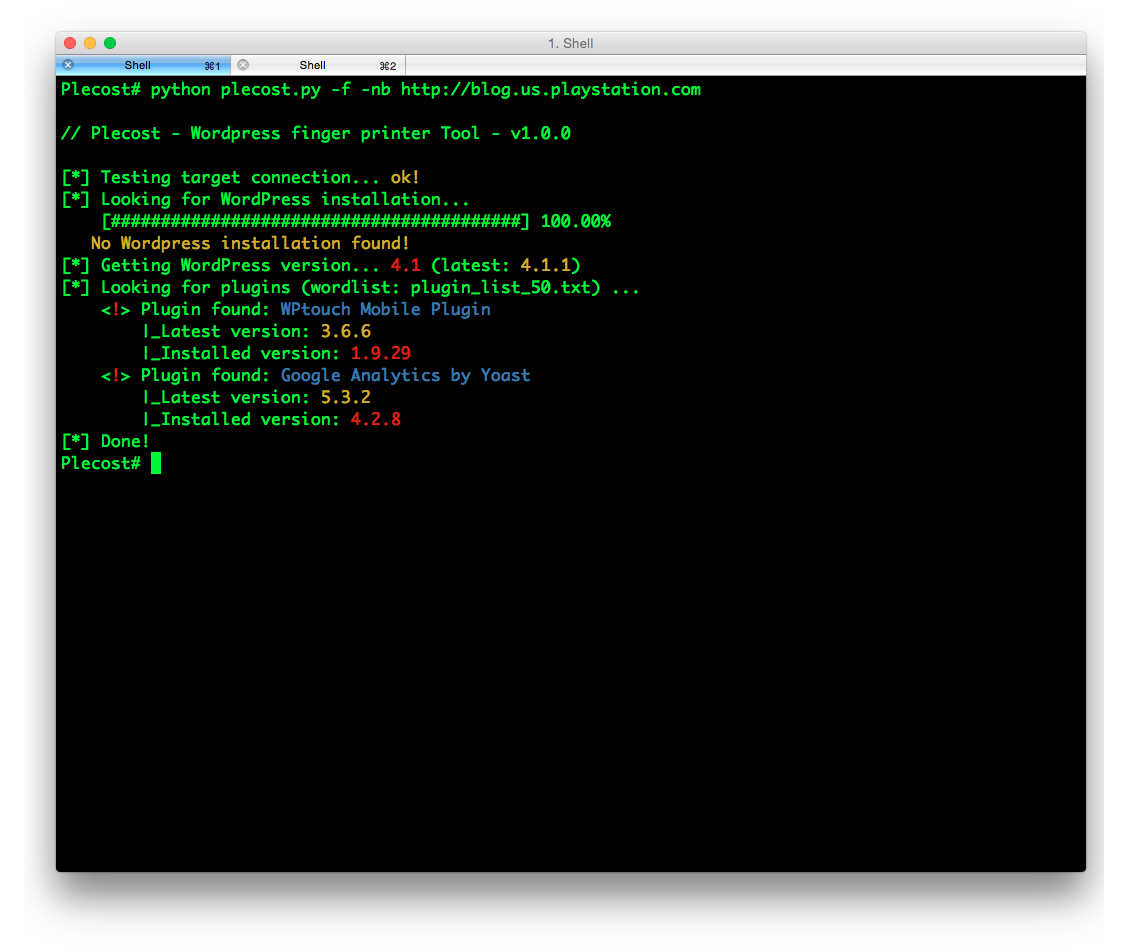
root@bt:/pentest/web/scanners/plecost# ./plecost-0.2.2-9-beta.py -i wp_plugin_list.txt -c http://127.0.0.1/wordpress 命令检查目标url并比对是否存在cve漏洞

可以很直观的看到结果,不少弱点暴露出来了.
Updating
New versions and vulnerabilities are released diary, you can upload the local database writing:
Updating vulnerability database:
|
1
|
$ plecost –update-cve
|
Updating plugin list:
|
1
|
$ plecost –update-plugins
|
Reading local vulnerability database
Plecost has a local vulnerability database of WordPress and wordpress plugins. You can consult it in off-line mode.
Listing all known plugins with vulnerabilities:
|
1
2
3
4
5
6
7
8
9
10
11
12
13
14
15
16
17
18
19
20
21
22
23
24
25
|
$ plecost -nb –show-plugins
// Plecost – WordPress finger printer Tool – v1.0.0
[*] Plugins with vulnerabilities known:
{ 0 } – acobot_live_chat_%26_contact_form
{ 1 } – activehelper_livehelp_live_chat
{ 2 } – ad-manager
{ 3 } – alipay
{ 4 } – all-video-gallery
{ 5 } – all_in_one_wordpress_security_and_firewall
{ 6 } – another_wordpress_classifieds_plugin
{ 7 } – anyfont
{ 8 } – april%27s_super_functions_pack
{ 9 } – banner_effect_header
{ 10 } – bannerman
{ 11 } – bib2html
{ 12 } – bic_media_widget
{ 13 } – bird_feeder
{ 14 } – blogstand-smart-banner
{ 15 } – blue_wrench_video_widget
…
[*] Done!
|
Show vulnerabilities of a concrete plugin:
|
1
2
3
4
5
6
7
8
9
10
11
12
13
14
15
16
|
$ plecost -nb -vp google_analytics
// Plecost – WordPress finger printer Tool – v1.0.0
[*] Associated CVEs for plugin ‘google_analytics’:
{ 0 } – CVE-2014-9174:
Affected versions:
<0> – 5.1.2
<1> – 5.1.1
<2> – 5.1
<3> – 5.1.0
[*] Done!
|
Show details of a concrete CVE:
|
1
2
3
4
5
6
7
8
9
10
|
$ plecost -nb –cve CVE-2014-9174
// Plecost – WordPress finger printer Tool – v1.0.0
[*] Detail for CVE ‘CVE-2014-9174’:
Cross-site scripting (XSS) vulnerability in the Google Analytics by Yoast (google-analytics-for-wordpress) plugin before 5.1.3 for WordPress allows remote attackers to inject arbitrary web script or HTML via the “Manually enter your UA code” (manual_ua_code_field) field in the General Settings.
[*] Done!
|
Examples
Getting the [100k top WordPress sites (http://hackertarget.com/100k-top-wordpress-powered-sites/) and getting aleatory one of them…
And… here more results of Plecost for real sites… 🙂

Where to fish?
Plecost is available on:
- BackTrack 5 http://www.backtrack-linux.org/
- BackBox http://www.backbox.org/
References
- http://www.securitybydefault.com/2010/03/seguridad-en-wordpress.html
- http://www.securitybydefault.com/2011/11/identificacion-de-vulnerabilidades-en.html
- http://www.clshack.it/plecost-a-wordpress-penetration-test-for-plugins
- http://securityetalii.wordpress.com/2010/03/06/auditando-wordpress-con-plecost/
- http://loginroot.diosdelared.com/?coment=6116
- http://ayudawordpress.com/securidad-en-wordpress/
- http://www.ehacking.net/2012/05/wordpress-security-vulnerability.html
根据官方的介绍,估计已经知道怎么使用这个工具了。
我们接下来介绍下WPScan怎么安装和使用
我将介绍 wpscan 的安装过程,以及怎样使用 wpscan 来定位那些已知的会让你的站点变得易受攻击的插件和主题。还有怎样安装和使用一款免费的网络探索和攻击的安全扫描软件 nmap 。最后展示的是使用 nikto 的步骤。
用 WPScan 测试 WordPress 中易受攻击的插件和主题
WPScan 是一个 WordPress 黑盒安全扫描软件,用 Ruby 写成,它是专门用来寻找已知的 WordPress 的弱点的。它为安全专家和 WordPress 管理员提供了一条评估他们的 WordPress 站点的途径。它的基于开源代码,在 GPLv3 下发行。
下载和安装 WPScan
在我们开始安装之前,很重要的一点是要注意 wpscan 不能在 Windows 下工作,所以你需要使用一台 Linux 或者 OS X 的机器来完成下面的事情。如果你只有 Windows 的系统,拿你可以下载一个 Virtualbox 然后在虚拟机里面安装任何你喜欢的 Linux 发行版本。
WPScan 的源代码放在 Github 上,所以需要先安装 git(LCTT 译注:其实你也可以直接从 Github 上下载打包的源代码,而不必非得装 git )。
sudo apt-get install git
git 装好了,我们就要安装 wpscan 的依赖包了。
在下载和启动wpscan脚本之前,我们需要的是先安装wpscan需要的依赖….
最先安装的应该是ruby,上文说道wpscan是ruby语言写的,那么你的计算机一定要能识别ruby语言才行貌似最新的是2.1版本。
sudo apt-get install ruby
然后接着运行以下命令:
sudo apt-get install libcurl4-gnutls-dev libxml2 libxml2-dev libxslt1-dev ruby-dev
然后,把wpscan从github上clone下来。
git clone https://github.com/wpscanteam/wpscan.git
现在我们可以进入这个新建立的 wpscan 目录,通过 bundler 安装必要的 ruby 包。
sudo gem install bundler && bundle install --without test development
现在wpscan装好了,我们就可以用它来搜索我们WordPress站点潜在的易受攻击的文件。wpcan最重要的方面是它能列出不仅是插件和主题,也能列出用户和缩略图的功能。WPScan 也可以用来暴力破解 WordPress
有必要的话,可以根据以下信息运行下。
完成后,我们更新WPScan的话,先进入到wpscan这个目录然后运行:
ruby wpscan.rb --update
但是可能,如果提示要ruby2.1.9才能达到运行的标准…..我们要安装2.1.9….,运行
sudo apt-get install ruby 2.1.9
既可。
完成后,查看下ruby版本:
ruby -v
然后运行:
ruby wpscan.rb --update
在运行wpscan.rb的时候,可能会出现如下的错误:
cannot load such file — bundler/setup (LoadError)
这个时候需要检查下是否已经安装了bundler,运行如下命令:
bundle -v
如果已经安装那么会出现版本信息。类似如下:
Bundler version 1.3.5
或者是查看bundler在哪个目录:
which bundler
有安装的话,会出现在哪个目录的。
列举插件
我们使用WPScan来列出wordpress网站所有插件,只需要加上 “–enumerate p” 参数,就像这样:
ruby wpscan.rb –url http(s)://www.yoursiteurl.com –enumerate p //根据协议填写地址,有的是https,而有的是http
或者仅仅列出易受攻击的插件:
ruby wpscan.rb --url http(s)://www.yoursiteurl.com --enumerate vp
下面是一些例子:
| Name: ukiscet
| Location: http://********.com/wp-content/plugins/akismet/
| Name: audio-player
| Location: http://********.com/wp-content/plugins/audio-player/
|
| * Title: Audio Player - player.swf playerID Parameter XSS
| * Reference: http://seclists.org/bugtraq/2013/Feb/35
| * Reference: http://secunia.com/advisories/52083
| * Reference: http://osvdb.org/89963
| * Fixed in: 2.0.4.6
| Name: bbpress - v2.3.2
| Location: http://********.com/wp-content/plugins/bbpress/
| Readme: http://********.com/wp-content/plugins/bbpress/readme.txt
|
| * Title: BBPress - Multiple Script Malformed Input Path Disclosure
| * Reference: http://xforce.iss.net/xforce/xfdb/78244
| * Reference: http://packetstormsecurity.com/files/116123/
| * Reference: http://osvdb.org/86399
| * Reference: http://www.exploit-db.com/exploits/22396/
|
| * Title: BBPress - forum.php page Parameter SQL Injection
| * Reference: http://xforce.iss.net/xforce/xfdb/78244
| * Reference: http://packetstormsecurity.com/files/116123/
| * Reference: http://osvdb.org/86400
| * Reference: http://www.exploit-db.com/exploits/22396/
| Name: contact
| Location: http://********.com/wp-content/plugins/contact/
列举主题
列举主题和列举插件差不多,只要用”–enumerate t”就可以了。
ruby wpscan.rb --url http(s)://www.host-name.com --enumerate t
或者只列出易受攻击的主题:
ruby wpscan.rb --url http(s)://www.host-name.com --enumerate vt
例子的输出:
| Name: path
| Location: http://********.com/wp-content/themes/path/
| Style URL: http://********.com/wp-content/themes/path/style.css
| Description:
| Name: pub
| Location: http://********.com/wp-content/themes/pub/
| Style URL: http://********.com/wp-content/themes/pub/style.css
| Description:
| Name: rockstar
| Location: http://********.com/wp-content/themes/rockstar/
| Style URL: http://********.com/wp-content/themes/rockstar/style.css
| Description:
|
| * Title: WooThemes WooFramework Remote Unauthenticated Shortcode Execution
| * Reference: https://gist.github.com/2523147
| Name: twentyten
| Location: http://********.com/wp-content/themes/twentyten/
| Style URL: http://********.com/wp-content/themes/twentyten/style.css
| Description:
列举用户
WPscan 也可以用来列举某个 WordPress 站点的用户和有效的登录记录。攻击者常常这么做——为了获得一个用户清单,好进行暴力破解。
ruby wpscan.rb --url http(s)://www.host-name.com --enumerate u
列举 Timthumb 文件
关于 WPscan ,我要说的最后一个功能是列举 timthub (缩略图)相关的文件。近年来,timthumb 已经成为攻击者眼里的一个常见目标,因为无数的漏洞被找出来并发到论坛上、邮件列表等等地方。用下面的命令可以通过 wpscan 找出易受攻击的 timthub 文件:
ruby wpscan.rb --url http(s)://www.host-name.com --enumerate tt
下面我们来介绍下用 Nmap 扫描你 VPS 的开放端口
Nmap 是一个开源的用于网络探索和安全审查方面的工具。它可以迅速扫描巨大的网络,也可一单机使用。Nmap 用原始 IP 数据包通过不同寻常的方法判断网络里那些主机是正在工作的,那些主机上都提供了什么服务(应用名称和版本),是什么操作系统(以及版本),用的什么类型的防火墙,以及很多其他特征。
在 Debian 和 Ubuntu 上下载和安装 nmap
要在基于 Debian 和 Ubuntu 的操作系统上安装 nmap ,运行下面的命令:
sudo apt-get install nmap
输出样例
Reading package lists... Done
Building dependency tree
Reading state information... Done
The following NEW packages will be installed:
  nmap
0 upgraded, 1 newly installed, 0 to remove and 2 not upgraded.
Need to get 1,643 kB of archives.
After this operation, 6,913 kB of additional disk space will be used.
Get:1 http://mirrors.service.networklayer.com/ubuntu/ precise/main nmap amd64 5.21-1.1ubuntu1 [1,643 kB]
Fetched 1,643 kB in 0s (16.4 MB/s)
Selecting previously unselected package nmap.
(Reading database ... 56834 files and directories currently installed.)
Unpacking nmap (from .../nmap_5.21-1.1ubuntu1_amd64.deb) ...
Processing triggers for man-db ...
Setting up nmap (5.21-1.1ubuntu1) ...
举个例子
输出 nmap 的版本:
nmap -V
或者
nmap --version
输出样例
Nmap version 5.21 ( http://nmap.org )
在 Centos 上下载和安装 nmap
要在基于 RHEL 的 Linux 上面安装 nmap ,输入下面的命令:
yum install nmap
输出样例
Loaded plugins: protectbase, rhnplugin, security
0 packages excluded due to repository protections
Setting up Install Process
Resolving Dependencies
--> Running transaction check
---> Package nmap.x86_64 2:5.51-2.el6 will be installed
--> Finished Dependency Resolution
Dependencies Resolved
================================================================================
 Package    Arch         Version               Repository                  Size
================================================================================
Installing:
 nmap       x86_64       2:5.51-2.el6          rhel-x86_64-server-6       2.8 M
Transaction Summary
================================================================================
Install       1 Package(s)
Total download size: 2.8 M
Installed size: 0
Is this ok [y/N]: y
Downloading Packages:
nmap-5.51-2.el6.x86_64.rpm                               | 2.8 MB     00:00
Running rpm_check_debug
Running Transaction Test
Transaction Test Succeeded
Running Transaction
  Installing : 2:nmap-5.51-2.el6.x86_64                                     1/1
  Verifying  : 2:nmap-5.51-2.el6.x86_64                                     1/1
Installed:
  nmap.x86_64 2:5.51-2.el6
Complete!
举个例子
输出 nmap 版本号:
nmap --version
输出样例
Nmap version 5.51 ( http://nmap.org )
用 Nmap 扫描端口
你可以用 nmap 来获得很多关于你的服务器的信息,它可以让你站在对你的网站不怀好意的人的角度看你自己的网站。
因此,请仅用它测试你自己的服务器或者在行动之前通知服务器的所有者。
nmap 的作者提供了一个测试服务器:
scanme.nmap.org
有些命令可能会耗时较长:
要扫描一个 IP 地址或者一个主机名(全称域名),运行:
nmap 192.168.1.1
输出样例:

扫描以获得主机的操作系统:
sudo nmap -O 192.168.1.1
加上“-”或者“/24”来一次性扫描某个范围里面的多个主机:
sudo nmap -PN xxx.xxx.xxx.xxx-yyy
扫描某个范围内可用的服务:
sudo nmap -sP network_address_range
扫描 IP 地址时部进行反向 DNS 解析。多数情况下这会加快你获得结果的速度:
sudo nmap -n remote_host
扫描一个特定端口而不是所有常用端口:
sudo nmap -p port_number remote_host
扫描一个网络,找出哪些服务器在线,分别运行了什么服务。
这就是传说中的主机探索或者 ping 扫描:
nmap -sP 192.168.1.0/24
输出样例:
Host 192.168.1.1 is up (0.00035s latency).
MAC Address: BC:AE:C5:C3:16:93 (Unknown)
Host 192.168.1.2 is up (0.0038s latency).
MAC Address: 74:44:01:40:57:FB (Unknown)
Host 192.168.1.5 is up.
Host nas03 (192.168.1.12) is up (0.0091s latency).
MAC Address: 00:11:32:11:15:FC (Synology Incorporated)
Nmap done: 256 IP addresses (4 hosts up) scanned in 2.80 second
理解端口配置和如何发现你的服务器上的攻击目标只是确保你的信息和你的 VPS 安全的第一步。
用 Nikto 扫描你网站的缺陷
Nikto 网络扫描器是一个开源的 web 服务器的扫描软件,它可以用来扫描 web 服务器上的恶意的程序和文件。Nikto 也可以用来检查软件版本是否过期。Nikto 能进行简单而快速地扫描以发现服务器上危险的文件和程序。扫描结束后会给出一个日志文件。
在 Linux 服务器上下载和安装 Nikto
Perl 在 Linux 上是预先安装好的,所以你只需要从项目页面下载 nikto ,解压到一个目录里面,然后开始测试。
wget https://cirt.net/nikto/nikto-2.1.4.tar.gz
你可以用某个归档管理工具解包,或者如下同时使用 tar 和 gzip :
tar zxvf nikto-2.1.4.tar.gz
cd nikto-2.1.4
perl nikto.pl
安装正确的话会得到这样的结果:
 - ***** SSL support not available (see docs for SSL install) *****
- Nikto v2.1.4
---------------------------------------------------------------------------
+ ERROR: No host specified
   -config+            Use this config file
   -Cgidirs+           scan these CGI dirs: 'none', 'all', or values like "/cgi/ /cgi-a/"
   -dbcheck            check database and other key files for syntax errors
   -Display+           Turn on/off display outputs
   -evasion+           ids evasion technique
   -Format+            save file (-o) format
   -host+              target host
   -Help               Extended help information
   -id+                Host authentication to use, format is id:pass or id:pass:realm
   -list-plugins       List all available plugins
   -mutate+            Guess additional file names
   -mutate-options+    Provide extra information for mutations
   -output+            Write output to this file
   -nocache            Disables the URI cache
   -nossl              Disables using SSL
   -no404              Disables 404 checks
   -port+              Port to use (default 80)
   -Plugins+           List of plugins to run (default: ALL)
   -root+              Prepend root value to all requests, format is /directory
   -ssl                Force ssl mode on port
   -Single             Single request mode
   -timeout+           Timeout (default 2 seconds)
   -Tuning+            Scan tuning
   -update             Update databases and plugins from CIRT.net
   -vhost+             Virtual host (for Host header)
   -Version            Print plugin and database versions
       + requires a value
Note: This is the short help output. Use -H for full help.
这个报错只是告诉我们没有给出必要的参数。SSL 支持可以通过安装相关的 perl ssl 模块得到(sudo apt-get install libnet-ssleay-perl)。
更新 nikto 数据库
在开始使用之前我们需要先更新 nikto 数据库:
/usr/local/bin/nikto.pl -update
下面的命令可以列出可用的 nikto 插件。
nikto.pl -list-plugins // To list the installed plugins //
扫描以寻找缺陷
我们用一个 url 来在做个简单的测试。
perl nikto.pl -h http://www.host-name.com
输出样例
会有十分冗长的输出,可能一开始会让人感到困惑。许多 Nikto 的警报会返回 OSVDB 序号。这是由开源缺陷数据库(http://osvdb.org/)所指定。你可以在 OSVDB 上找出相关缺陷的深入说明。
$ nikto -h http://www.host-name.com
- Nikto v2.1.4
---------------------------------------------------------------------------
+ Target IP:         1.2.3.4
+ Target Hostname:    host-name.com
+ Target Port:        80
+ Start Time:         2012-08-11 14:27:31
---------------------------------------------------------------------------
+ Server: Apache/2.2.22 (FreeBSD) mod_ssl/2.2.22 OpenSSL/1.0.1c DAV/2
+ robots.txt contains 4 entries which should be manually viewed.
+ mod_ssl/2.2.22 appears to be outdated (current is at least 2.8.31) (may depend on server version)
+ ETag header found on server, inode: 5918348, size: 121, mtime: 0x48fc943691040
+ mod_ssl/2.2.22 OpenSSL/1.0.1c DAV/2 - mod_ssl 2.8.7 and lower are vulnerable to a remote buffer overflow which may allow a remote shell (difficult to exploit). CVE-2002-0082, OSVDB-756.
+ Allowed HTTP Methods: GET, HEAD, POST, OPTIONS, TRACE
+ OSVDB-877: HTTP TRACE method is active, suggesting the host is vulnerable to XST
+ /lists/admin/: PHPList pre 2.6.4 contains a number of vulnerabilities including remote administrative access, harvesting user info and more. Default login to admin interface is admin/phplist
+ OSVDB-2322: /gallery/search.php?searchstring=<script>alert(document.cookie)</script>: Gallery 1.3.4 and below is vulnerable to Cross Site Scripting (XSS). Upgrade to the latest version. http://www.securityfocus.com/bid/8288.
+ OSVDB-7022: /calendar.php?year=<script>alert(document.cookie);</script>&month=03&day=05: DCP-Portal v5.3.1 is vulnerable to  Cross Site Scripting (XSS). http://www.cert.org/advisories/CA-2000-02.html.
+ OSVDB-3233: /phpinfo.php: Contains PHP configuration information
+ OSVDB-3092: /system/: This might be interesting...
+ OSVDB-3092: /template/: This may be interesting as the directory may hold sensitive files or reveal system information.
+ OSVDB-3092: /updates/: This might be interesting...
+ OSVDB-3092: /README: README file found.
+ 6448 items checked: 1 error(s) and 14 item(s) reported on remote host
+ End Time:           2012-08-11 15:52:57 (5126 seconds)
---------------------------------------------------------------------------
+ 1 host(s) tested
$
Nikto 是一个非常轻量级的通用工具。因为 Nikto 是用 Perl 写的,所以它可以在几乎任何服务器的操作系统上运行。
未经允许不得转载:哈勃私语 » 安装wordpress网站安全检测工具
本文共15565个字 创建时间:2017年11月25日16:27