tp5连接微信公众号的问题

在一个业务需求的驱使下,笔者尝试着处理把微信公众号的服务器配置的url绑定到tp5中,就是以tp5作为后端服务,提供API服务。

网上找了很多都不是自己要找的,天随人愿,终于看到了这么一篇文章:微信公众号连接thinkphp5

正是自己想要找的,如果大家想要关注的话,请关注他(QQ:820032120),也是在这个作者的帮助下,解决了这个问题,很热心的一个小伙。

好的,基于他提供的方案,应该是没有问题,但是我根据这个实践,发现有问题,老是报错:

为了方便测试,我新建了一个模块,命名为:weixin

然后在这个模块的控制器中把以下代码贴进去:

<?php 
 namespace app\weixin\controller;
 use think\Controller;
 use think\Loader;
 use think\Session;

class Index extends Controller{

public function Index(){

//验证消息
 if(isset($_GET['echostr'])){
 $echoStr = $_GET["echostr"];
 if($this->checkSignature()){
 header('content-type:text');
 echo $echoStr;
 exit;
 }
 }else{
 
 }
 }

//检查签名
 private function checkSignature()
 {
 $signature = $_GET["signature"];
 $timestamp = $_GET["timestamp"];
 $nonce = $_GET["nonce"];
 $token = 'zuijiadaxueweixin';
 $tmpArr = array($token, $timestamp, $nonce);
 sort($tmpArr, SORT_STRING);
 $tmpStr = implode($tmpArr);
 $tmpStr = sha1($tmpStr);

if($tmpStr == $signature){
 return true;
 }else{
 return false;
 }
 }

}

?>

这个注意与原创作者相互区别,做个对比的话,这里其实也就是把响应消息删除了。

原创的写法如下:

<?php
namespace app\weixin\controller;
use \think\Request;
use think\Db;

class Index {

public function Index(){
 //验证消息
 if(isset($_GET['echostr'])){ //微信服务器和你的服务器第一次通讯会带上echostr
 $echoStr = $_GET["echostr"];
 if($this->checkSignature()){
 header('content-type:text');
 echo $echoStr;
 exit;
 }
 }else{
 $this -> responseMsg();
 }
 }

//检查签名
 private function checkSignature()
 {
 $signature = $_GET["signature"];
 $timestamp = $_GET["timestamp"];
 $nonce = $_GET["nonce"];
 $token = '123456798';
 $tmpArr = array($token, $timestamp, $nonce);
 sort($tmpArr, SORT_STRING);
 $tmpStr = implode($tmpArr);
 $tmpStr = sha1($tmpStr);

if($tmpStr == $signature){
 return true;
 }else{
 return false;
 }
 }

//响应消息
 public function responseMsg()
 { 
     $postStr = isset($GLOBALS["HTTP_RAW_POST_DATA"]) ? $GLOBALS["HTTP_RAW_POST_DATA"]  : "" ;
     if (!empty($postStr)){
         $postObj = simplexml_load_string($postStr, 'SimpleXMLElement', LIBXML_NOCDATA);
         $RX_TYPE = trim($postObj->MsgType);
         switch ($RX_TYPE)
         {
             case "event":
                 $result = $this->receiveEvent($postObj);
                 break;
             case "text":
                 $result = $this->receiveText($postObj);
                 break;
             case "image":
                 $result = $this->receiveImage($postObj);
                 break;
             case "location":
                 $result = $this->receiveLocation($postObj);
                 break;
             case "voice":
                 $result = $this->receiveVoice($postObj);
                 break;
             case "video":
                 $result = $this->receiveVideo($postObj);
                 break;
             case "link":
                 $result = $this->receiveLink($postObj);
                 break;
             default:
                 $result = "unknown msg type: ".$RX_TYPE;
                 break;
         }
         echo $result;
     }
 }

public function testinfo(){
 echo "hello world";
 }
}

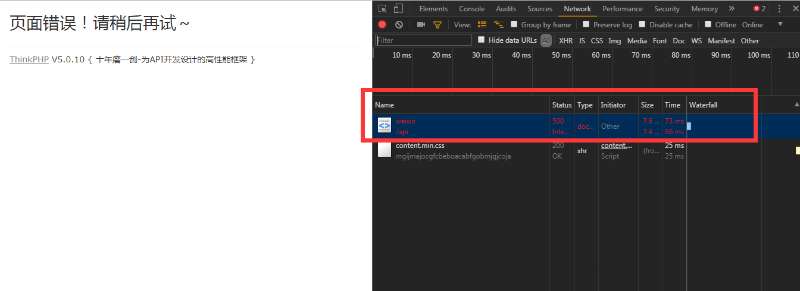
在笔者的实践下,发现这个有点问题,就是报错,但是排查了,错误没有消除。后来就有了我上面的那个精简版。这个是在实践中获得验证的,没有报错。其实阅读起来也很容易理解:一个是检查消息、另一个是验证签名。

如果还需要有响应消息,应该是要把原创作者的后面那部分加上去。但是根据自己的实践,当我们把响应消息加上去的时候,又报错了,所以之所以作者写的方法报错,那么报错的地方应该是响应消息那块。大家在实践的时候,多多留意。

这里来个题外话,在解决这个问题的过程中,花了很长时间处理git的排错,笔者开着两台电脑,两边都编辑着同一个文件夹下的内容,然后就是两边提交,后面就发生冲突了。后面总是报错,什么冲突没有解决之类的,或者是提交之类的,但是还有一种情况也发生了,情况是这样的,我其中一台是用的linux桌面版,另一台是用的是windows,结果当我从windows系统编辑完成后提交的东西,我在linux上打开会多了一些符号:^M,这个是windows的换行符,平常我们是看不到的,需要特殊的编辑器才行。

本来这里一直发现没有啥问题的,可是一直报错,却不知道哪里有问题,这个时候,我们不妨用linux的Emditor编辑器.

利用cookie实现“只弹出一次窗口”的JS代码

弹出式窗口通常被用来做弹出广告(CPM),其实用弹出式窗口用来做消息通知也是最普遍而且是最有效的方法,但如果每次刷新页面特别是刷新首页都要弹出窗口的话,那绝对是让访问者厌烦的事情。

比如你将上面的脚本放在一个需要频繁经过的页面里(例如首页),那么每次刷新这个页面,窗口都会弹出一次,我们使用cookie来控制一下就可以了。

原理:编写代码查看当前访问者计算机上的Cookie中是否包含有本网站的信息,如果有,则此计算机已经不是第一次访问首页,再次浏览首页时无需弹出广告窗口;否则,就弹出广告。

<script>
  window.onload=loadpopup();
  function openwin(){
  window.open("page.html","","width=200,height=200")
  }
  function get_cookie(Name) {
  var search = Name + "="
  var returnvalue = "";
  if (document.cookie.length > 0) {
  offset = document.cookie.indexOf(search)
  if (offset != -1) {
  offset += search.length
  end = document.cookie.indexOf(";", offset);
  if (end == -1)
  end = document.cookie.length;
  returnvalue=unescape(document.cookie.substring(offset, end))
  }
  }
  return returnvalue;
  }
  function loadpopup(){
  if (get_cookie('popped')==''){
  openwin()
     document.cookie="popped=yes"
  }
  }
</script>

禁止Sublime Text 3总是出现烦人的提醒更新新版本

Sublime Text 3总是出现烦人的提醒更新新版本,再网络上找了资料尝试了很多次,都没有成功
1、找到Preferences -> Settings-User(设置用户)

如果没有的话,就选择Settings,点击进去后在后面,添加”update_check”:false,这里提醒下,因为是加在后面,记得在中括号后面加一个逗号,笔者就是忘记加这个逗号导致一直不生效却找不到原因。

{
 "color_scheme": "Packages/Color Scheme - Default/Sunburst.tmTheme",
 "ignored_packages":
 [
 "Vintage"
 ],
 "update_check": false
}

2、在最后一个花括号{}中添加一句:”update_check”:false

ubuntu桌面版sublime text3 中无法输入中文的问题

ublime text很好用,但是ubuntu下不能输入中文,这是一个很大的问题。网上已经有很多方法,这里将我自己使用的方法记录总结一下。

本方法适用于ubuntu、debian操作系统

首先,将你的操作系统升级到最新版

sudo apt-get update
sudo apt-get upgrade

clone修复项目到本地

git clone https://github.com/lyfeyaj/sublime-text-imfix.git

运行脚本

cd sublime-text-imfix && ./sublime-imfix

完成! 重新启动后就可以在sublime text 3 中 使用Fcitx/搜狗拼音了!

解决wordpress联系表单contact form 7文件上传的问题

笔者在很久前处理一个客户需求的时候,有些人喜欢在联系表单里面有个文件上传的功能,其实这个也不难,可是当时把我害得很苦,我几乎寻遍了整个互联网,居然没人遇到我这种问题。

我的问题:网站的用户在网站前台留言,然后上传了一个文件,我在邮箱中收到了留言的电邮,但是我却始终收不到他们上传的文件。

我用的时候contact form 7这个插件,我也是设置 “没问题” 的,先截图吧:

红色框框中就是文件上传的代码,以前可不是这样设置的,不知道听某个人说要把limit:10MB,倒是没什么效果,后来在我伙伴英明的指导下,这样设置 limit:10485760,相关的换算,请参考这个网站:http://whatsabyte.com

看到了吧,这个是以Byte作为单位的,所以这里设置应该为 limit:10485760. 这是我犯的第一个错误

接着我还是不能在附件里面收到上传的文件,我一直以来的思路是在收件箱那里建一个文件路径:

upload file:[_url]/wp-content/uploads/wpcf7_uploads/[file-833]

其中:[_url]代表网站的域名,[file-833]代表文件的名称,这个路径是contact form 7安装后自动创建的目录。可是无论我在前台的联系表单发送了多少次,我都没法在这个目录下找到我上传的文件。后来不知道在哪里获取的灵感,想到了这里:

这个我一直是空着的,我加任何东西进去,于是把控制文件上传的简码放进去后,事情就变得简单了。当我再次在网站前台发送了一条测试电邮,并且上传了一个PDF,这个时候我在邮箱中的附件中看到了前台上传的文件:

这个时候需要补充的时候,我们可以根据自己业务需求,我们可以进行文件的上传文件类型做一个过滤处理,比如:filetypes:rar|pdf|zip|doc|docx|xsl等等。

[file file-833 limit:10485760 filetypes:rar|pdf|zip|doc|docx|xsl]

完成!

contact form 7特殊功能(Special Mail Tags)

wordpress的联系表单插件中,相必contact form 7算是最有人气的了,功能也是非常强大,使用也很方便,最重要的是免费。那么今天给大家分享一些关于这个插件的一些特殊功能,以便满足不同的业务需求,比如很久前我的一个客户就说了,如何知道我的收到的客户询盘是来自哪个产品的呢?这个相必在外贸或者是贸易中经常用的一个功能,这个时候我们需要这么做:跟踪这个电邮发送的页面url地址,那么不就可以知道客户是来自哪个产品的了么,好的废话少说,直接贴出来:

Special Mail Tags for Submissions

[_remote_ip] — This tag is replaced by the submitter’s IP address.

[_user_agent] — This tag is replaced by the submitter’s user agent (browser) information.

[_url] — This tag is replaced by the URL of the page in which the contact form is placed.

[_date] — This tag is replaced by the date of the submission.

[_time] — This tag is replaced by the time of the submission.

[_invalid_fields] — This tag is replaced by the number of form fields with invalid input.

[_serial_number] — This tag is replaced by a numeric string whose value increments, so this tag can work as the serial number of each submission. Requires Flamingo 1.5+ be installed.

Post-Related Special Mail Tags

These special mail-tags provide information about the post that contains the contact form.

Be aware that these [_post_*] tags work only when the contact form is placed inside post content. In cases where the contact form is outside of post content, such as when the contact form is placed in a sidebar widget or embedded in a theme’s template file, a blank text will replace the tag.

[_post_id] — This tag is replaced by the ID of the post.

[_post_name] — This tag is replaced by the name (slug) of the post.

[_post_title] — This tag is replaced by the title of the post.

[_post_url] — This tag is replaced by the permalink URL of the post.

[_post_author] — This tag is replaced by the author name of the post.

[_post_author_email] — This tag is replaced by the author email of the post.

Site-Related Special Mail Tags

These special mail-tags provide information about the WordPress website on which you manage the contact forms. You’ll find them especially useful when you want to reuse the same set of contact form templates between many websites, because you are freed from manual modification of the site information for each website.

[_site_title] — This tag is replaced by the title of the website.

[_site_description] — This tag is replaced by the description (tagline) of the website.

[_site_url] — This tag is replaced by the home URL of the website.

[_site_admin_email] — This tag is replaced by the email address of the primary admin user of the website.

User-Related Special Mail Tags

These special mail-tags provide information about the current logged-in user.

Since these [_user_*] tags work only when the submitter has an account on the WordPress site and is logged in, it is recommended to turn on the subscribers-only mode setting anytime you use these tags.

If you want to use these tags but don’t want to use the subscribers-only mode, explicitly turn on the nonce setting. Otherwise, the logged-in user data will be reset by the WP REST API, and a blank text will replace the tag.

[_user_login] — This tag is replaced by the login name of the user.

[_user_email] — This tag is replaced by the email address of the user.

[_user_url] — This tag is replaced by the website URL of the user.

[_user_first_name] — This tag is replaced by the first name of the user.

[_user_last_name] — This tag is replaced by the last name of the user.

[_user_nickname] — This tag is replaced by the nickname of the user.

[_user_display_name] — This tag is replaced by the display name of the user.

笔者很负责的说,这篇文章,我只是一个热心的搬运工,让大家能够方便的解决问题。看不懂的,可以用谷歌翻译下,然后自己实践一下即可。

让WordPress注册后直接显示密码

给WordPress添加一个注册之后可以直接看见密码的功能吧!因为最近打算开启注册功能,打算分享一些注册才能够有权限看的内容,不过原本的WordPress注册只能通过邮件的方式将密码发送给用户,

这样虽然能够通过邮箱验证用户的有效性,不过却是麻烦了很多的步骤,比如中途可能导致发送邮件失败,用户邮箱忘记密码,恶意注册,刷账号等等,因为只要注册了,不管别人看不看的到密码,这个号都算是有效的了。

让WordPress注册后直接显示密码

1.首先你需要打开网址的注册功能,这个就不用多说了。

2.打开位于wordpress根目录下的wp-login.php,然后找到这句代码:

$errors->add('registered', __('Registration complete. Please check your email.'), 'message');

替换成下面的代码:

// 读取 注册后写进 cookies 的用户名 和密码
$errors->add('registered', __('注册成功!用户名:'.$_COOKIE["u"].' 密码:'.$_COOKIE["user_pass"].'(登录后自行修改成便于你记忆的密码)'), 'message');

3在 wp-includes/user.php下找到 这行代码:

update_user_option( $user_id, 'default_password_nag', true, true ); //Set up the Password change nag.

在其下面添加

// 把注册的用户名和随机生成的密码写进 cookie
setcookie("u",$user_login);
setcookie("user_pass",$user_pass);

这样一来当用户注册的时候就可以直接显示密码了。

效果图如下图所示:

因为这里修改了wordpress的源码,所以为了安全起见,最好把原文件备份一下,方便恢复,如果wordpress更新后会覆盖这两个文件的。